使用 Sqoop 进行数据交换
SQOOP = “ SQl to HadOOP”
一、开始使用 Sqoop
1.1 Sqoop 介绍
为什么要用 Sqoop ?
导入(import)—— 将数据从 RDBMS 转移到 HDFS
导出(export)—— 将数据从 HDFS 转移到 RDBMS
我们虽然进入了大数据时代, 但是之前还有好多数据存储在 RDBMS 中, 我们如何对其进行数据迁移 ?
这时 Sqoop 出现了, 就像用勺子将哈根达斯挖到甜筒中一样
Sqoop 将 RDBMS 中的数据 import 到 HDFS 等大数据数据库中
而将 HDFS 等数据库中的数据 export 到 RDBMS 中
至于我们为什么要用到第二种 ?
有的小公司没有大数据技术, 但是还是想使用我们的数据, 怎么办 ?
我们就需要使用 Sqoop 来将我们存储在 HDFS 中的数据给到他们的 RDBMS 中
1.2 Sqoop 安装
现在默认打开了虚拟机, 并且一切都配置好了
登录 Mysql
二、Sqoop 工具
展示所有数据库
1
2
3
4
5
| $ sqoop list-databases \
--connect jdbc:mysql://127.0.0.1:3306 \
--username root \
--password 123456 \
–-verbose
|
1
2
3
4
5
6
7
8
9
10
11
12
13
14
15
| $ sqoop list-databases \
--connect jdbc:mysql://127.0.0.1:3306 \
--username root \
--password 123456 \
–-verbose
|
在命令行询问密码
1
2
3
4
| $ sqoop list-databases \
--connect jdbc:mysql://127.0.0.1:3306 \
--username root –P \
-verbose
|
1
2
3
4
5
6
7
8
9
| $ sqoop list-databases \
--connect jdbc:mysql://127.0.0.1:3306 \
--username root –P \
-verbose
|
将密码保存到密码文件中, 用的时候再调用
记得,文件里只能有一行,而且直接是密码,不要有多余的东西
我有一次试了好久没成功发现文件里多了个空行。。。
1
| $ echo -n 'Root123!' > /tools/.mysql.password
|
1
2
3
4
5
6
7
8
| $ echo -n 'Root123!' > /tools/.mysql.password
|
通过密码文件来寻找密码(这样就不用输入了,这就是为啥 Linux 非常安全)
1
2
3
4
| $ sqoop list-databases \
--connect jdbc:mysql://127.0.0.1:3306 \
--username root \
--password-file file:///tools/.mysql.password
|
1
2
3
4
5
6
7
8
| $ sqoop list-databases \
--connect jdbc:mysql://127.0.0.1:3306 \
--username root \
--password-file file:///tools/.mysql.password
|
顺带一提
三、Sqoop import 工具
3.1 Importing data from MySQL to HDFS
将数据从 RDBMS import 到 HDFS
3.1.1 表中没有主键
先登录 MySQL
创建数据库, 表并插入数据
1
2
3
4
| create database niit;
use niit;
create table author(author_name varchar(65), total_no_of_articles int, phone_no int, address varchar(65));
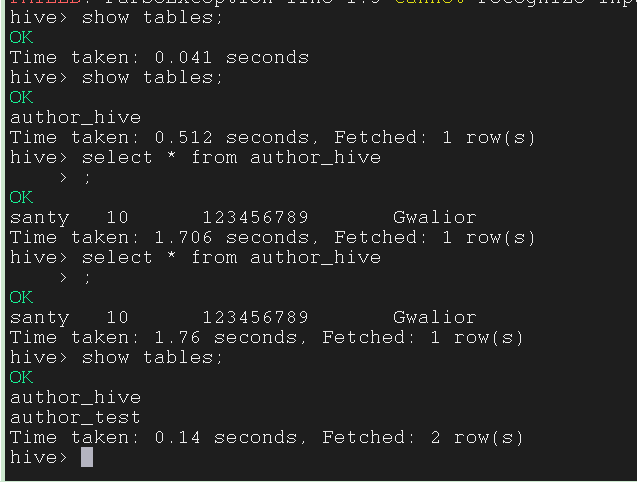
insert into author values(“santy”,10,123456789,”Gwalior”);
|
启动 Hadoop
启动 Hive, 另开一个窗口
在 Hive 中创建数据库, 不用创建表
1
2
| create database niitbd3;
use niitbd3;
|
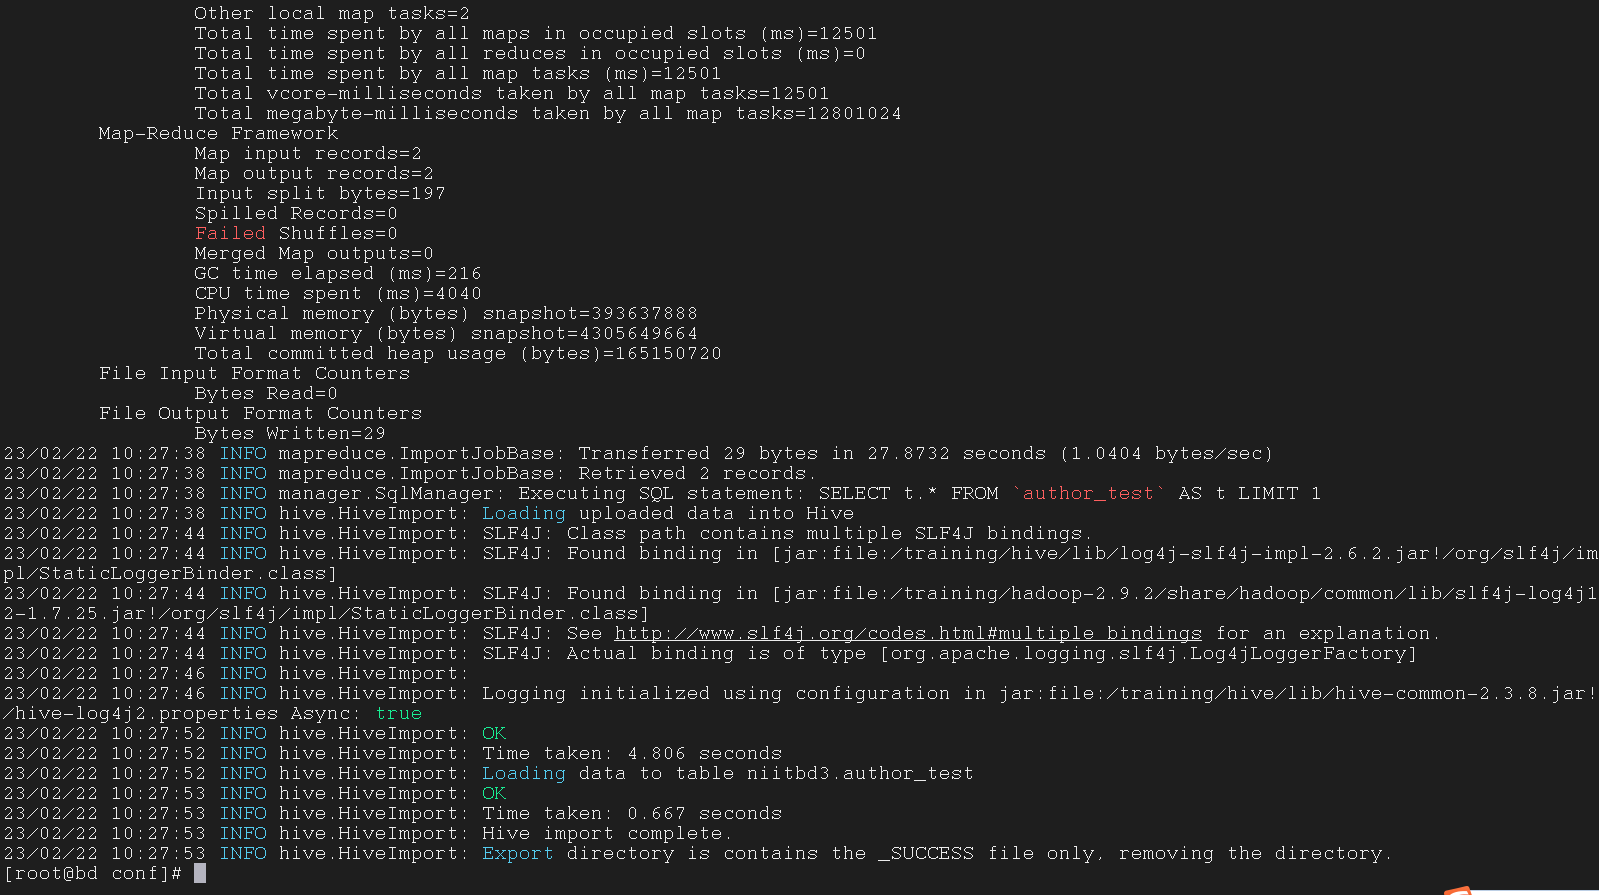
在 Hadoop 上运行下列命令 ( Sqoop 指令), 另开一个窗口
1
2
3
4
5
6
| $ sqoop import --connect \
jdbc:mysql://127.0.0.1:3306/niit \
--username root --password 123456 \
--table author \
--hive-import --hive-table niitbd3.author_hive \
--m 1
|
1
2
3
4
5
6
7
8
9
10
11
12
13
| $ sqoop import --connect \
jdbc:mysql://127.0.0.1:3306/niit \
--username root --password 123456 \
--table author \
--hive-import --hive-table niitbd3.author_hive \
--m 1
|
在 Hive 中查看表, 成功 import
3.1.2 表中有主键
先登录 MySQL
创建数据库, 表并插入数据
1
2
3
4
5
| create database niit;
use niit;
create table author_test(id int primary key, name varchar(64), age int, major varchar(64));
insert into author_test values(1, “santy”, 10, ”CS”);
insert into author_test values(2, “Andrew”, 10, ”CS”);
|
启动 Hadoop
启动 Hive, 另开一个窗口
在 Hive 中创建数据库, 不用创建表
1
2
| create database niitbd3;
use niitbd3;
|
在 Hadoop 上运行下列命令 ( Sqoop 指令), 另开一个窗口
1
2
3
4
5
6
7
| $ sqoop import --connect \
jdbc:mysql://127.0.0.1:3306/niit \
--username root --password 123456 \
--table author_test \
--split-by id \
--hive-import --create-hive-table \
--hive-table niitbd3.author_test
|
1
2
3
4
5
6
7
8
9
10
11
12
13
| $ sqoop import --connect \
jdbc:mysql://127.0.0.1:3306/niit \
--username root --password 123456 \
--table author_test \
--split-by id \
--hive-import --create-hive-table \
--hive-table niitbd3.author_test
|
在 Hive 中查看表, 成功 import
3.1.3 注意事项
--m 1 与 --split-by id \ 都是用来调用 MapReduce 的指令, 没有会报错, 不能同时用, 要二选一--split-by id \ 中的 id 是主键, 要先死后活--m 1 是用来分配 mapper 的, 有几行 (row) 后面的数字就是几import 到 Hive 中时,表是自动生成的,我们只需要确定表名即可
3.2 Import data from Windows MySQL
Windows 中的 MySQL import 到 Linux 中的 Hive
(不过都学到这里了操作系统什么的就无所谓了)
3.2.1 开放 Linux 与 Windows 中 MySQL 中的端口连接
首先要安装 MySQL8.0 服务
1
2
3
4
| USE mysql;
CREATE USER 'root'@'Linux_IP' IDENTIFIED BY 'Windows_Mysql_密码' ;
GRANT ALL ON *.* TO 'root'@'Linux_IP';
FLUSH PRIVILEGES;
|
1
2
3
4
5
6
7
| USE mysql;
CREATE USER 'root'@'Linux_IP' IDENTIFIED BY 'Windows_Mysql_密码' ; # 创建一个名为 Linux_IP 的 root 用户
GRANT ALL ON *.* TO 'root'@'Linux_IP'; # 授予用户全局权限
FLUSH PRIVILEGES; # 更新内存权限数组,使全局权限授权指令生效
|
如果在这里报错 Caused by: java.sql.SQLException: Access denied for user 'root'@'bd' (using password: YES),请见我的另一篇文章
3.2.2 开始进行 import
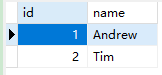
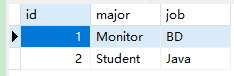
先在 MySQL 中创建两个带主键的表, 并插入数据(下面两张表主键都是 id)
1
2
3
4
5
6
7
8
9
10
11
12
13
14
15
16
| create database test;
create table stu_coll(
id, int,
name varchar(65),
job varchar(65)
);
insert into stu_coll values(1,"Mobitor",”BD”);
insert into stu_coll values(2,"Student",”Java”);
create table stu_per(
id, int,
name varchar(65)
);
insert into stu_per values(1,"Andrew");
insert into stu_per values(2,"Tim");
|
1
2
3
4
5
6
7
8
9
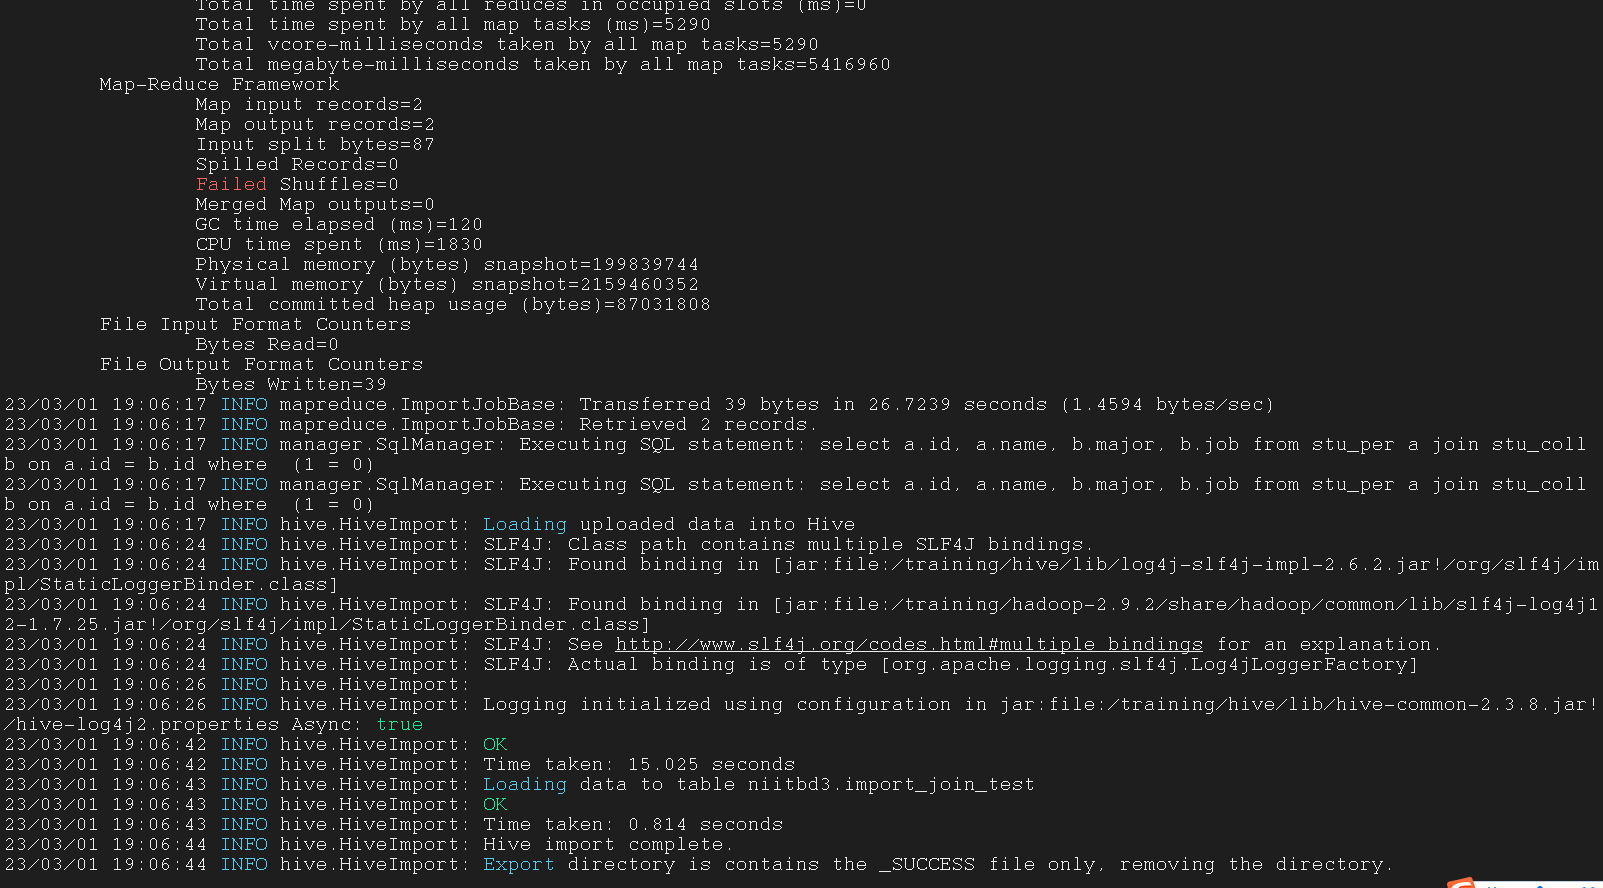
| $ sqoop import \
--connect jdbc:mysql://192.168.1.1:3305/test \
--username root --password 123456 \
--query 'select a.id, a.name, b.major, b.job from stu_per a join stu_coll b on a.id = b.id where $CONDITIONS' \
--split-by a.id \
--hive-import \
--hive-table niitbd3.import_join_test \
--target-dir /test \
--m 1
|
1
2
3
4
5
6
7
8
9
10
11
12
13
14
15
16
17
18
19
20
21
22
23
24
25
| $ sqoop import \
--connect jdbc:mysql://192.168.1.1:3305/test \
--username root --password 123456 \
--query 'select a.id, a.name, b.major, b.job from stu_per a join stu_coll b on a.id = b.id where $CONDITIONS' \
--split-by a.id \
--hive-import \
--hive-table niitbd3.import_join_test \
--target-dir /test \
--m 1
|

3.3 Import-all-tables command
如果要使用 import-all-tables 指令, 则所有表都要有主键, 不然会报错
将 MySQL 中的所有表 import 到指定路径
1
2
3
| $ sqoop import-all-tables \
--connect jdbc:mysql://127.0.0.1:3306/test \
--username root --P
|
将除了指定的几个表以外的其他表都 import 到指定路径
1
2
3
4
| $ sqoop import-all-tables \
--connect jdbc:mysql://127.0.0.1:3306/test \
--username root --P \
--exclude-tables <table1>,<tables2>
|
1
2
3
4
5
6
7
8
9
| $ sqoop import-all-tables \
--connect jdbc:mysql://127.0.0.1:3306/test \
--username root --P \
--exclude-tables <table1>,<tables2>
|

3.4 Other Import
3.4.1 Compress Import
压缩导入
1
2
3
4
5
6
| $ sqoop import \
--connect jdbc:mysql://192.168.1.1:3305/test \
--username root --password 123456 \
--table stu_per \
--compress \
--compression-codec org.apache.hadoop.io.compress.BZip2Codec
|
1
2
3
4
5
6
7
8
9
10
11
| $ sqoop import \
--connect jdbc:mysql://192.168.1.1:3305/test \
--username root --password 123456 \
--table stu_per \
--compress \
--compression-codec org.apache.hadoop.io.compress.BZip2Codec
|
3.4.2 Bulk Import
快速导入
1
2
3
4
5
| $ sqoop import \
--connect jdbc:mysql://192.168.1.1:3305/test \
--username root --password 123456 \
--table stu_per \
--direct
|
1
2
3
4
5
6
7
8
9
| $ sqoop import \
--connect jdbc:mysql://192.168.1.1:3305/test \
--username root --password 123456 \
--table stu_per \
--direct
|
3.4.3 Incremental Import
增量导入
我们已经将表导入后,又更新了这个表,还想把这个新表导入
但是再导入之前已经有的那些数据会浪费资源,这时候我们就要用增量导入
1
2
3
4
5
6
7
| $ sqoop import \
--connect jdbc:mysql://192.168.1.1:3305/test \
--username root --password 123456 \
--table stu_coll \
--incremental append \
--check-column id \
--last-value 1
|
1
2
3
4
5
6
7
| $ sqoop import \
--connect jdbc:mysql://192.168.1.1:3305/test \
--username root --password 123456 \
--table stu_coll \
--incremental append \
--check-column id \
--last-value 1
|
3.4.4 Custom Boundary Query Import
自定义边界查询导入
1
2
3
4
5
6
7
| $ sqoop import \
--connect jdbc:mysql://192.168.1.1:3305/test \
--username root --password 123456 \
--query 'select a.id, stu_coll.major, stu_coll.job from stu_per a join stu_coll using(id) where $CONDITIONS' \
--split-by id \
--target-dir /bd31 \
--boundary-query 'select min(id), max(id) from stu_per'
|
1
2
3
4
5
6
7
8
9
10
11
12
13
| $ sqoop import \
--connect jdbc:mysql://192.168.1.1:3305/test \
--username root --password 123456 \
--query 'select a.id, stu_coll.major, stu_coll.job from stu_per a join stu_coll using(id) where $CONDITIONS' \
--split-by id \
--target-dir /bd31 \
--boundary-query 'select min(id), max(id) from stu_per'
|
3.5 File Import
各种类型的文件导入
3.5.1 Sqoop data in text file format
导入为 .txt 文件格式
将 Windows MySQL 中的表以 .txt 文件的格式存储在 HDFS 中(这里用的是 MapReduce)
1
2
3
4
5
6
7
8
9
10
| $ sqoop import \
--connect jdbc:mysql://192.168.1.1:3305/test \
--username root --password 123456 \
--query 'select * from ttable WHERE $CONDITIONS' \
--m 2 \
--as-textfile \
--target-dir /bd3/tbl \
--split-by id \
--fields-terminated-by ',' \
--lines-terminated-by ' '
|
1
2
3
4
5
6
7
8
9
10
11
12
13
14
15
16
17
18
19
20
| $ sqoop import \
--connect jdbc:mysql://192.168.1.1:3305/test \
--username root --password 123456 \
--query 'select * from ttable WHERE $CONDITIONS' \
--m 2 \
--as-textfile \
--target-dir /bd3/tbl \
--split-by id \
--fields-terminated-by ',' \
--lines-terminated-by ' '
|
1
2
| $ hdfs dfs -ls /test/tbl
$ hadoop fs -text hdfs_path > local_file.txt
|
在 Hive 中的建表,必须要与 .txt 文件的类型相同
根据数据选择数据类型
Windows Linux 用 load
在 hdfs 中了已经, 就用 location
1
| create external table ttable(id int, name string) row format delimited fields terminated by ',' location '/bd3/tbl';
|
导入为 .avro 文件格式
avrofile
avro 文件包含可用于将数据集拆分为适合 MapReduce 处理的子集的标记
一些数据交换服务使用代码声测好难过器来解释数据定义并生成代码来访问数据, 但avro 不需要这一步, 因此非常适合脚本语言
avro() - 表数据
avsc(Linux) - 表结构
1
2
3
4
5
6
7
8
9
| $ sqoop import \
--connect jdbc:mysql://192.168.1.1:3305/test \
--username root -password 123456 \
--query 'select * from stu_coll where $CONDITIONS' \
--m 3 \
--split-by id \
--as-avrodatafile \
--outdir /tools/tblA \
--target-dir /test/tblA
|
1
2
3
4
5
6
7
8
9
10
11
12
13
14
15
16
17
18
| $ sqoop import \
--connect jdbc:mysql://192.168.1.1:3305/test \
--username root -password 123456 \
--query 'select * from stu_coll where $CONDITIONS' \
--m 3 \
--split-by id \
--as-avrodatafile \
--outdir /tools/tblA \
--target-dir /test/tblA
|
在 HDFS 中检查文件内容
1
2
| $ cat /tools/tblA/QueryResult.avsc
$ hdfs dfs -cat /test/tblA/part-m-00000.avro
|
1
2
3
4
5
6
7
8
9
10
| $ cat /tools/tblA/QueryResult.avsc
$ hdfs dfs -cat /test/tblA/part-m-00000.avro
|
创建适配 .avro 文件的 Hive 表
1
2
3
4
5
6
7
| create external table tbla
row format SERDE 'org.apache.hadoop.hive.serde2.avro.AvroSerDe'
stored as
INPUTFORMAT 'org.apache.hadoop.hive.ql.io.avro.AvroContainerInputFormat'
OUTPUTFORMAT 'org.apache.hadoop.hive.ql.io.avro.AvroContainerOutputFormat'
location '/test/tblA'
TBLPROPERTIES ('avro.schema.url'='file:///tools/tblA/QueryResult.avsc');
|
1
2
3
4
5
6
7
8
9
10
11
12
13
| create external table tbla # 建表, 这里就不用属性分隔符了
row format SERDE 'org.apache.hadoop.hive.serde2.avro.AvroSerDe' # 反序列化格式包
stored as
INPUTFORMAT 'org.apache.hadoop.hive.ql.io.avro.AvroContainerInputFormat' # 输入格式包
OUTPUTFORMAT 'org.apache.hadoop.hive.ql.io.avro.AvroContainerOutputFormat' # 输出格式包
location '/test/tblA' # HDFS 中的存储路径
TBLPROPERTIES ('avro.schema.url'='file:///tools/tblA/QueryResult.avsc'); # Linux 中的存储路径
|
导入为 .parquet 文件格式
parquetfile
它是一种开源的, 面向列的数据文件格式, 专为游戏哦啊的数据存储 和检索而设计, 它提供高效的数据压缩和编码方案, 据欧增强
不可以使用 -query, 只能用 -table 表名
1
2
3
4
5
6
7
8
9
| $ sqoop import \
--connect jdbc:mysql://192.168.1.1:3305/test \
--username root --password 123456 \
--table stu_coll \
--m 3 \
--split-by id \
--as-parquetfile \
--outdir /tools/tblP \
--target-dir /test/tblP
|
1
2
3
4
5
6
7
8
9
10
11
12
13
14
15
16
17
| $ sqoop import \
--connect jdbc:mysql://192.168.1.1:3305/test \
--username root --password 123456 \
--table stu_coll \
--m 3 \
--split-by id \
--as-parquetfile \
--outdir /tools/tblP \
--target-dir /test/tblP
|
1
| create external table tblP(id int, age int, city string) row format delimited fields terminated by ',' stored as parquetfile location '/test/tblP';
|
导入为二进制文件格式
sequence 文件
1
2
3
4
5
6
7
8
9
| $ sqoop import \
--connect jdbc:mysql://localhost:3306/test \
--username root -password 123456 \
--table ttable2 \
--m 3 \
--split-by id \
--as-sequencefile \
--outdir /tools/tblS \
--target-dir /test/tblS
|
1
2
3
4
5
6
7
8
9
10
11
12
13
14
15
16
17
| $ sqoop import \
--connect jdbc:mysql://localhost:3306/test \
--username root -password 123456 \
--table ttable2 \
--m 3 \
--split-by id \
--as-sequencefile \
--outdir /tools/tblS \
--target-dir /test/tblS
|
1
| create external table tblS(id int, age int, city string) row format delimited fields terminated by ',' stored as sequencefile location '/test/tblS';
|
3.6 Import subset of RDBMS Table to HDFS
将 RDBMS 表的子集 import 到 HDFS
3.6.1 Import partial columns
导入部分列
1
2
3
4
5
6
7
8
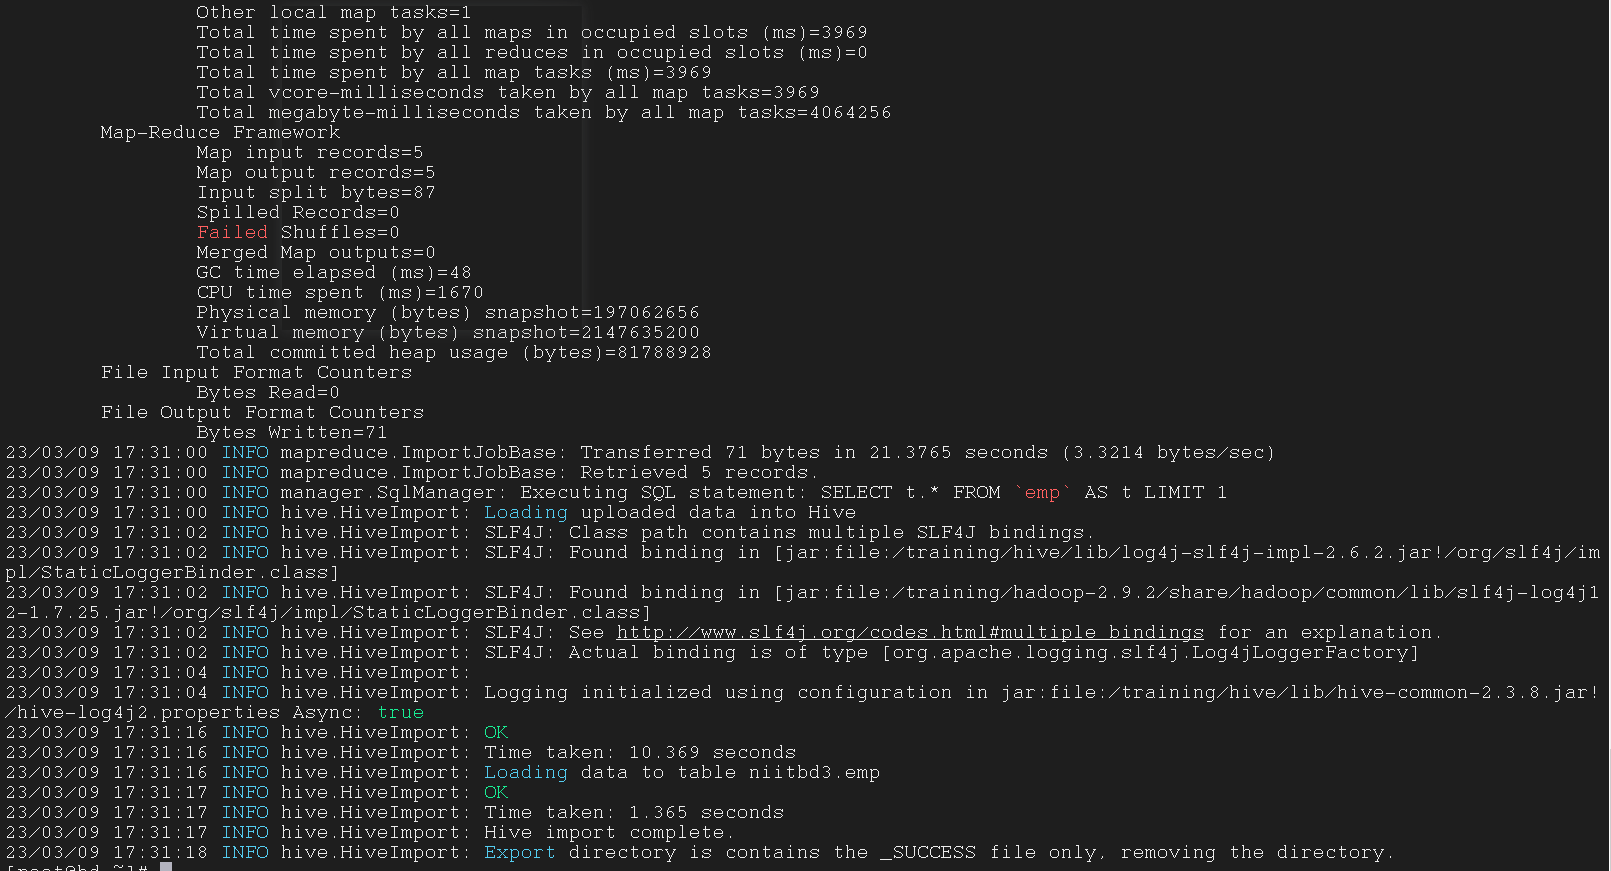
| $ sqoop import -connect jdbc:mysql://192.168.1.1:3305/test \
--username root -password dcef1396dnf \
--table emp \
--columns name,id,dept \
--hive-import \
--hive-table niitbd3.emp \
--target-dir /sqoopIquery \
--m 1
|
1
2
3
4
5
6
7
8
9
10
11
12
13
14
15
16
17
| $ sqoop import -connect jdbc:mysql://192.168.1.1:3305/test \
--username root -password dcef1396dnf \
--table emp \
--columns name,id,dept \
--hive-import \
--hive-table niitbd3.emp \
--target-dir /sqoopIquery \
--m 1
|
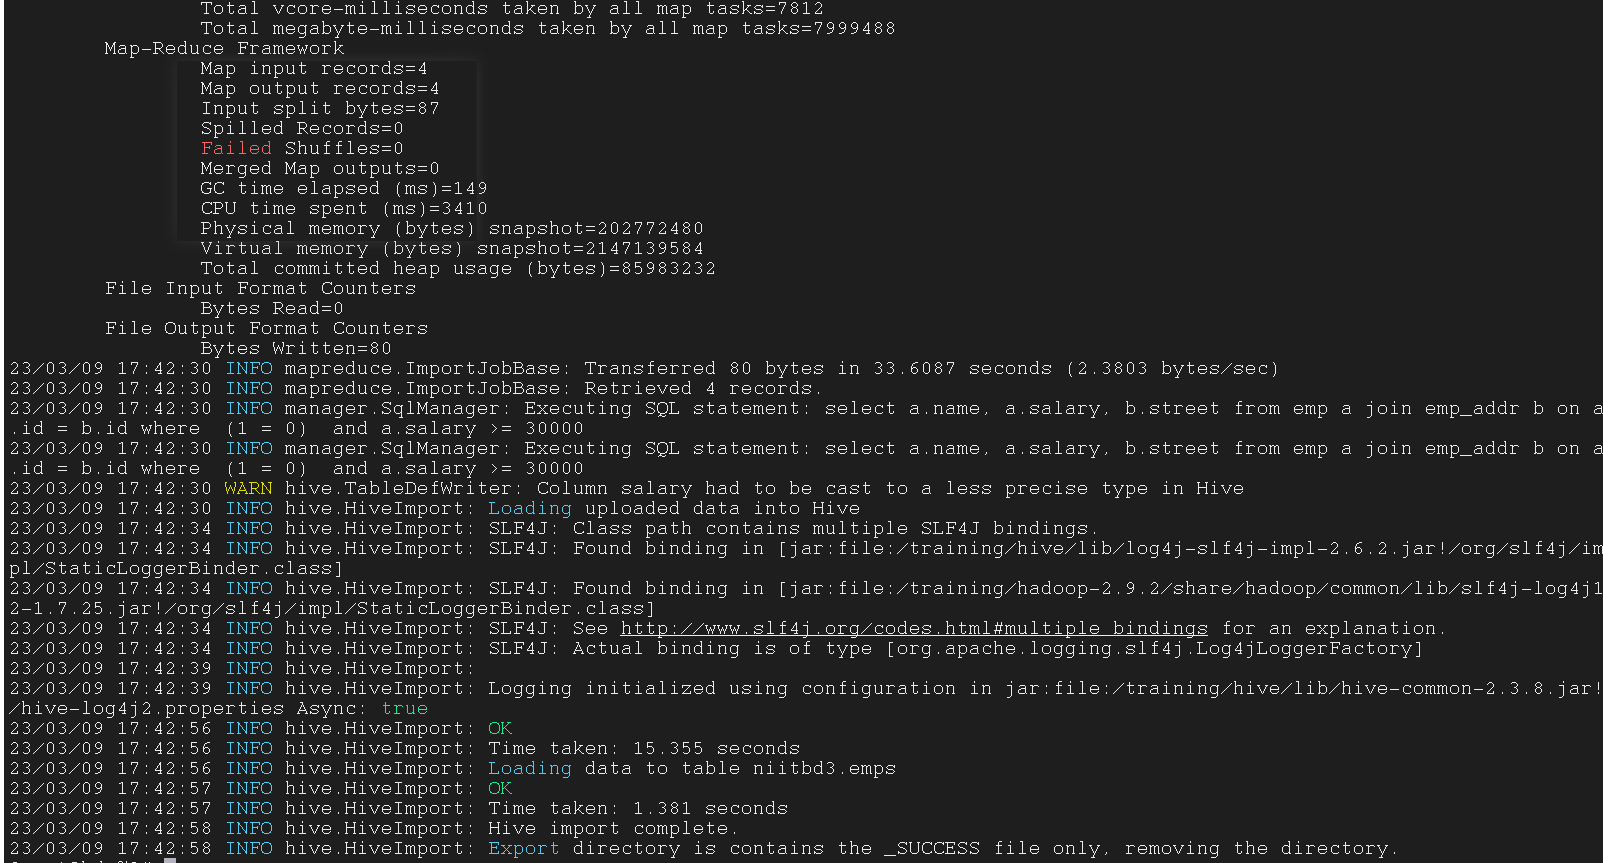
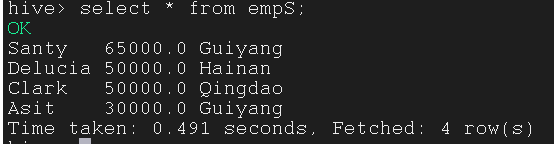
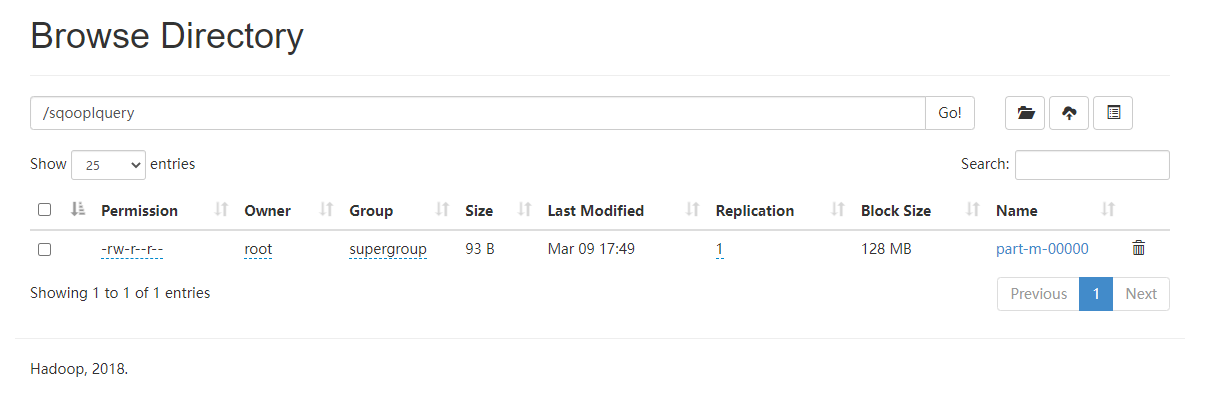
3.6.2 Import data via custom query statement using –-query option
使用 --query 选项通过自定义查询语句导入数据
1
2
3
4
5
6
7
| $ sqoop import -connect jdbc:mysql://192.168.1.1:3305/test \
--username root -password 123456 \
--query 'select a.name, a.salary, b.street from emp a join emp_addr b on a.id = b.id where $CONDITIONS and a.salary >= 30000 ' \
--hive-import \
--hive-table niitbd3.empS \
--target-dir /sqoopIquery \
--m 1
|
1
2
3
4
5
6
7
8
9
10
11
12
13
14
15
| $ sqoop import -connect jdbc:mysql://192.168.1.1:3305/test \
--username root -password 123456 \
--query 'select a.name, a.salary, b.street from emp a join emp_addr b on a.id = b.id where $CONDITIONS and a.salary >= 30000 ' \
--hive-import \
--hive-table niitbd3.empS \
--target-dir /sqoopIquery \
--m 1
|
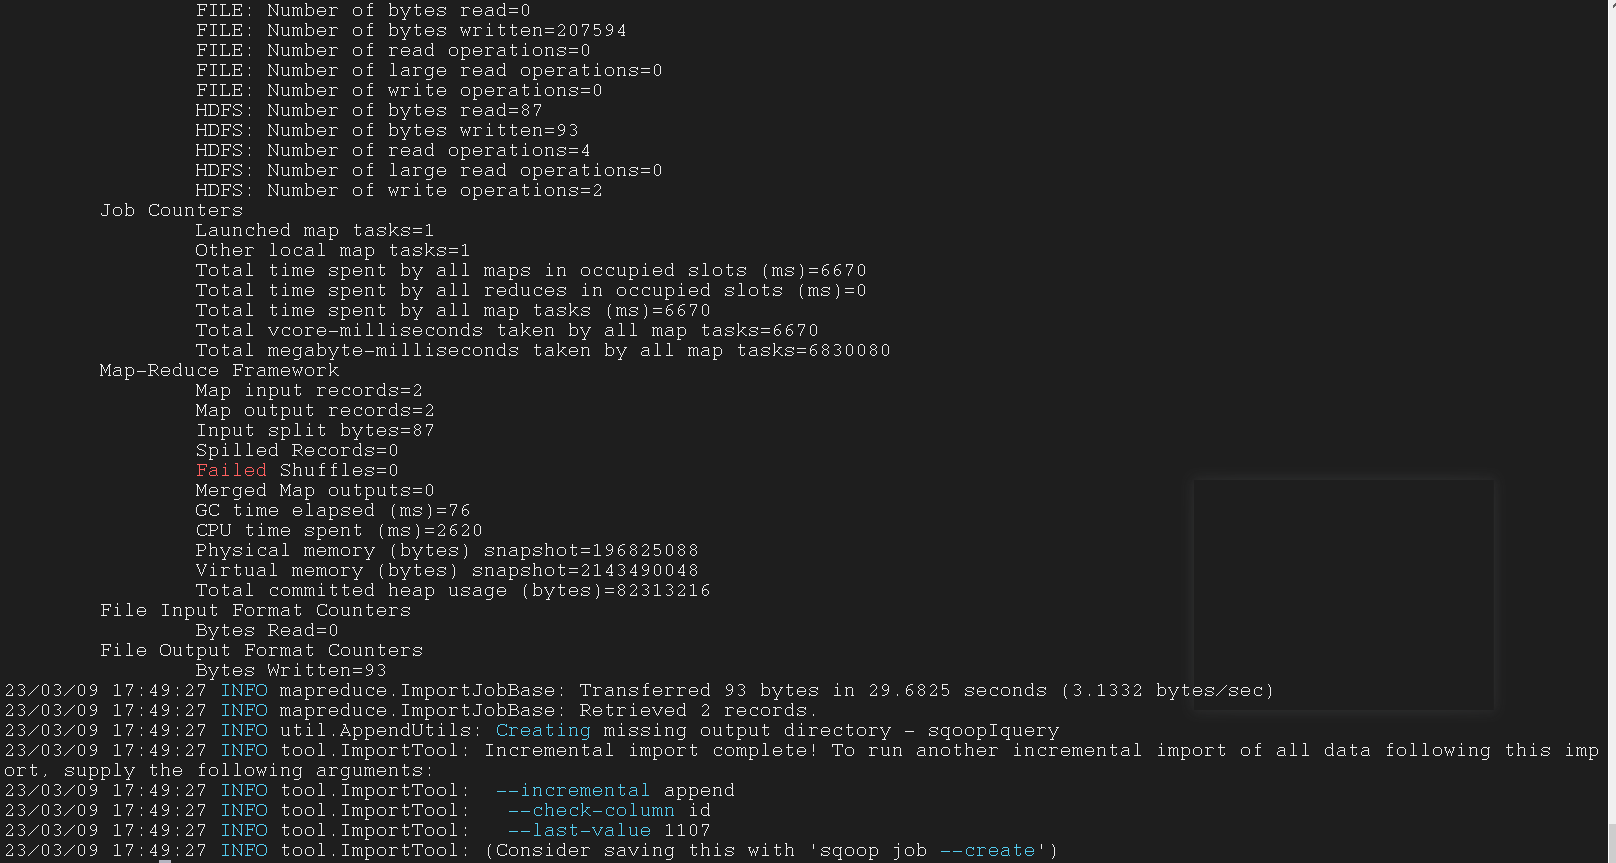
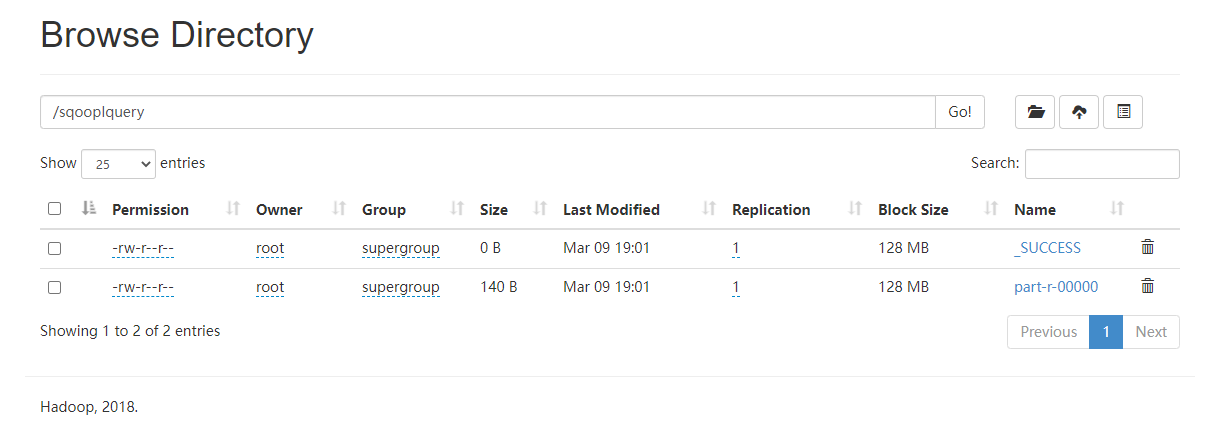
3.6.3 Incremental Import
增量导入, 将表中新增的行进行单独导入
1
2
3
4
5
6
7
8
9
| $ sqoop import \
--connect jdbc:mysql://192.168.1.1:3305/test \
--username root -password 123456 \
--table emp \
--incremental append \
--check-column id \
--last-value 1105 \
--target-dir /sqoopIquery \
--m 1
|
1
2
3
4
5
6
7
8
9
10
11
12
13
14
15
16
17
18
| $ sqoop import \
--connect jdbc:mysql://192.168.1.1:3305/test \
--username root -password 123456 \
--table emp \
--incremental append \
--check-column id \
--last-value 1105 \
--target-dir /sqoopIquery \
--m 1
|

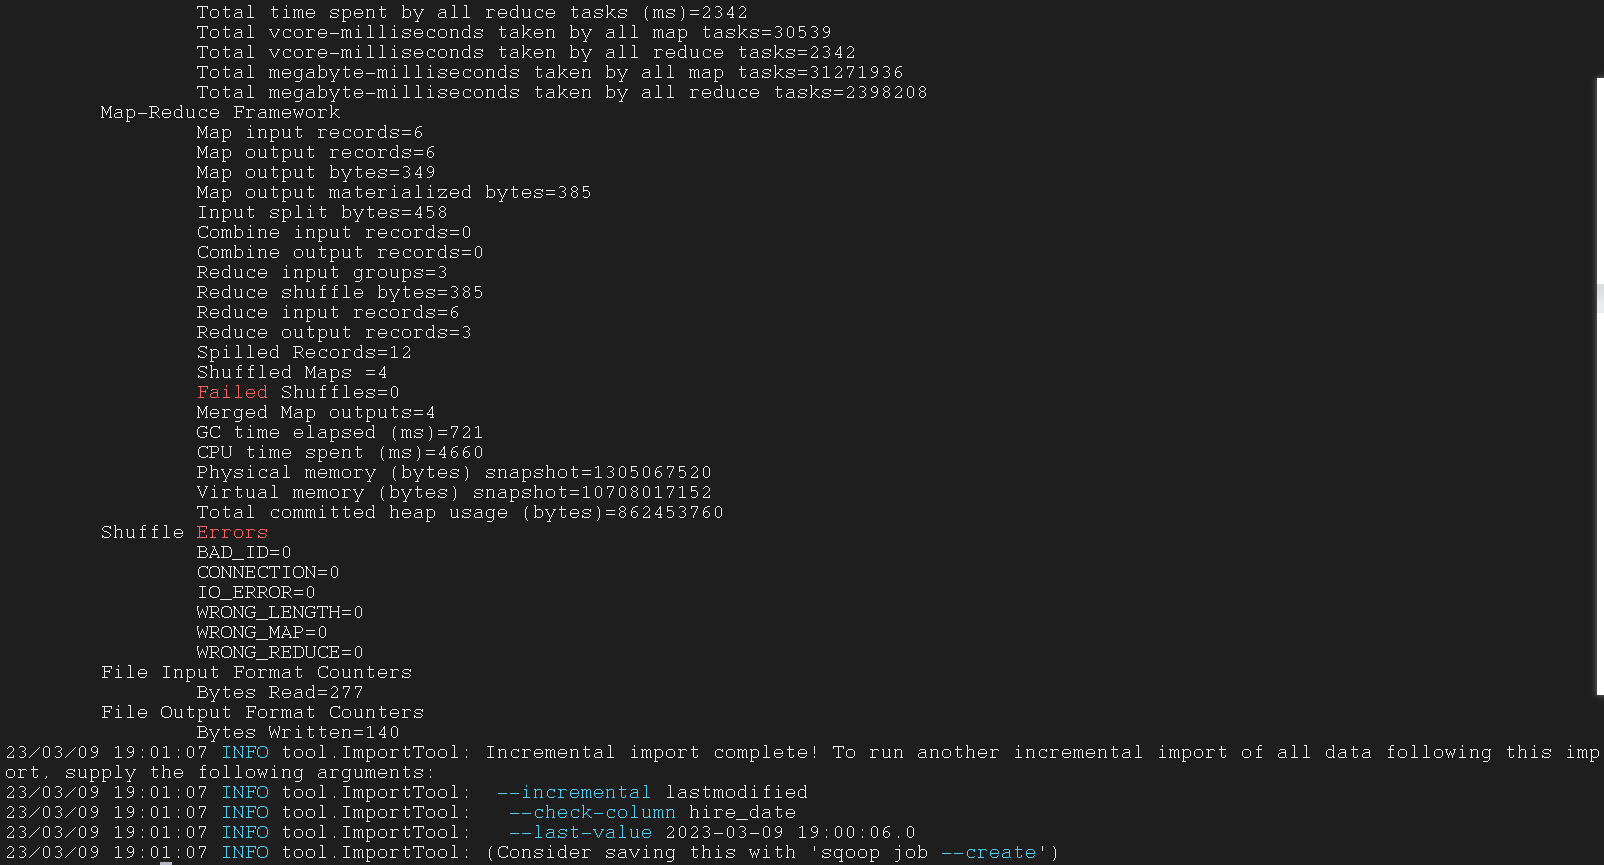
3.6.4 Incremental data import using lastmodified mode
使用 lastmodified 模式增量数据导入
lastmodified 模式会指定最后修改时间, 这个时间之后的数据都是新数据
1
2
3
4
5
6
7
8
| $ sqoop import -connect jdbc:mysql://192.168.1.1:3305/test \
--username root -password 123456 \
--table emp \
--incremental lastmodified \
--check-column hire_date -last-value '2019-05-02' \
--target-dir /sqoopIquery \
--m 1 \
--append
|
1
2
3
4
5
6
7
8
9
10
11
12
13
14
15
16
17
| $ sqoop import -connect jdbc:mysql://192.168.1.1:3305/test \
--username root -password 123456 \
--table emp \
--incremental lastmodified \
--check-column hire_date -last-value '2019-05-02' \
--target-dir /sqoopIquery \
--m 1 \
--append
|


3.6.5 Use –merge-key option to import
使用 --merge-key 选项导入
--merge-key 表示将 MapReduce 中指定路径下的所有相同 key 的 part-m-% 文件合并为一个 part-r-% 文件
1
2
3
4
5
6
7
8
| $ sqoop import -connect jdbc:mysql://192.168.1.1:3305/test \
--username root -password 123456 \
--table emp \
--incremental lastmodified \
--check-column hire_date -last-value '2019-05-02' \
--target-dir /sqoopIquery \
--m 1 \
--merge-key id
|
1
2
3
4
5
6
7
8
9
10
11
12
13
14
15
| $ sqoop import -connect jdbc:mysql://192.168.1.1:3305/test \
--username root -password 123456 \
--table emp \
--incremental lastmodified \
--check-column hire_date -last-value '2019-05-02' \
--target-dir /sqoopIquery \
--m 1 \
--merge-key id
|

四、Sqoop export 工具
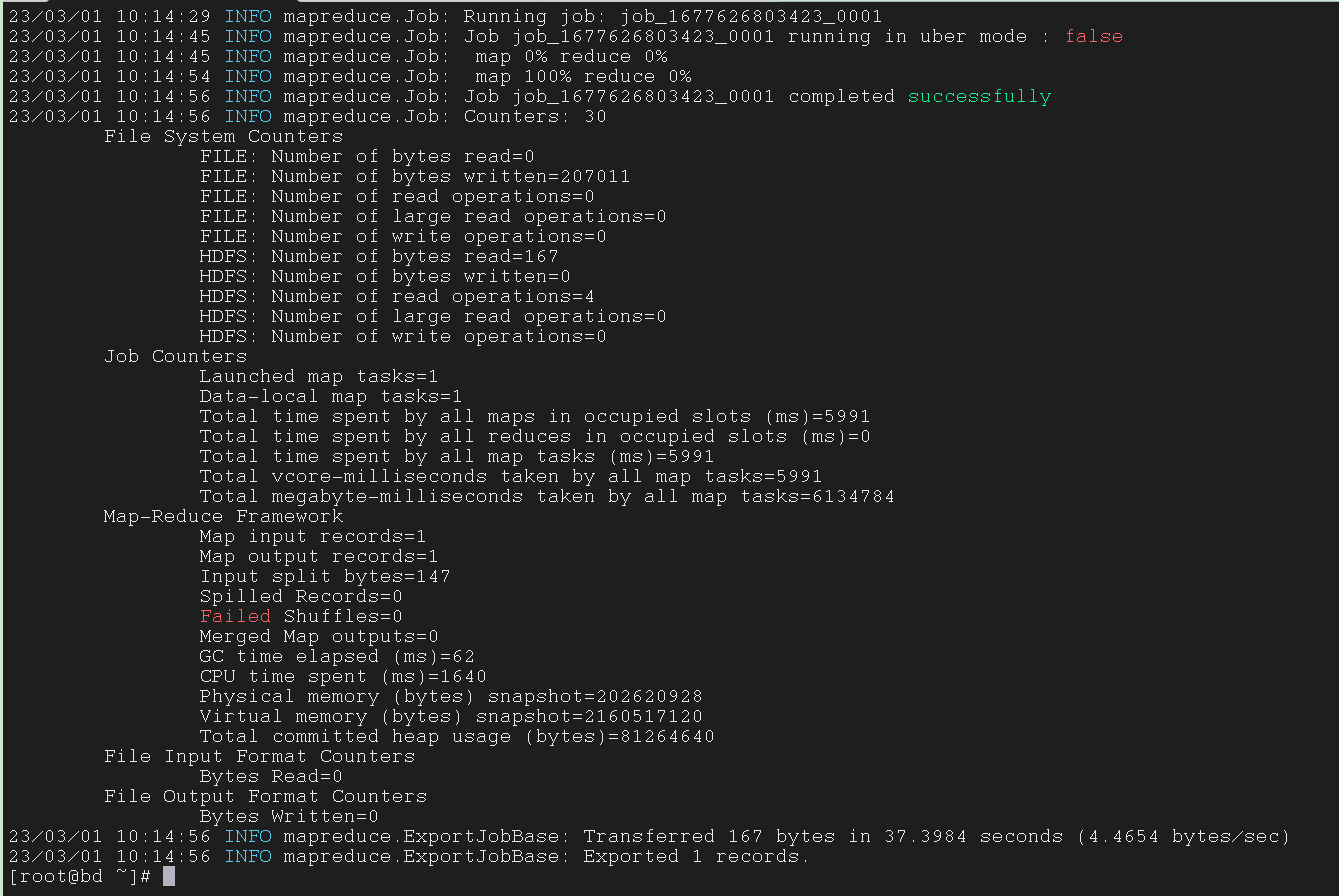
4.1 Exporting data from HDFS to MySQL
将数据从 HDFS export到 RDBMS
启动 Hadoop
启动 Hive
进入 Hive 中的数据库
在 Hive 中创建表
1
| create table export_test(name string, age int, city string) row format delimited fields terminated by ',';
|
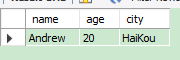
在 Hive 中插入数据
1
| insert into export_test values(‘Andrew’, 20, ‘HaiKou’);
|
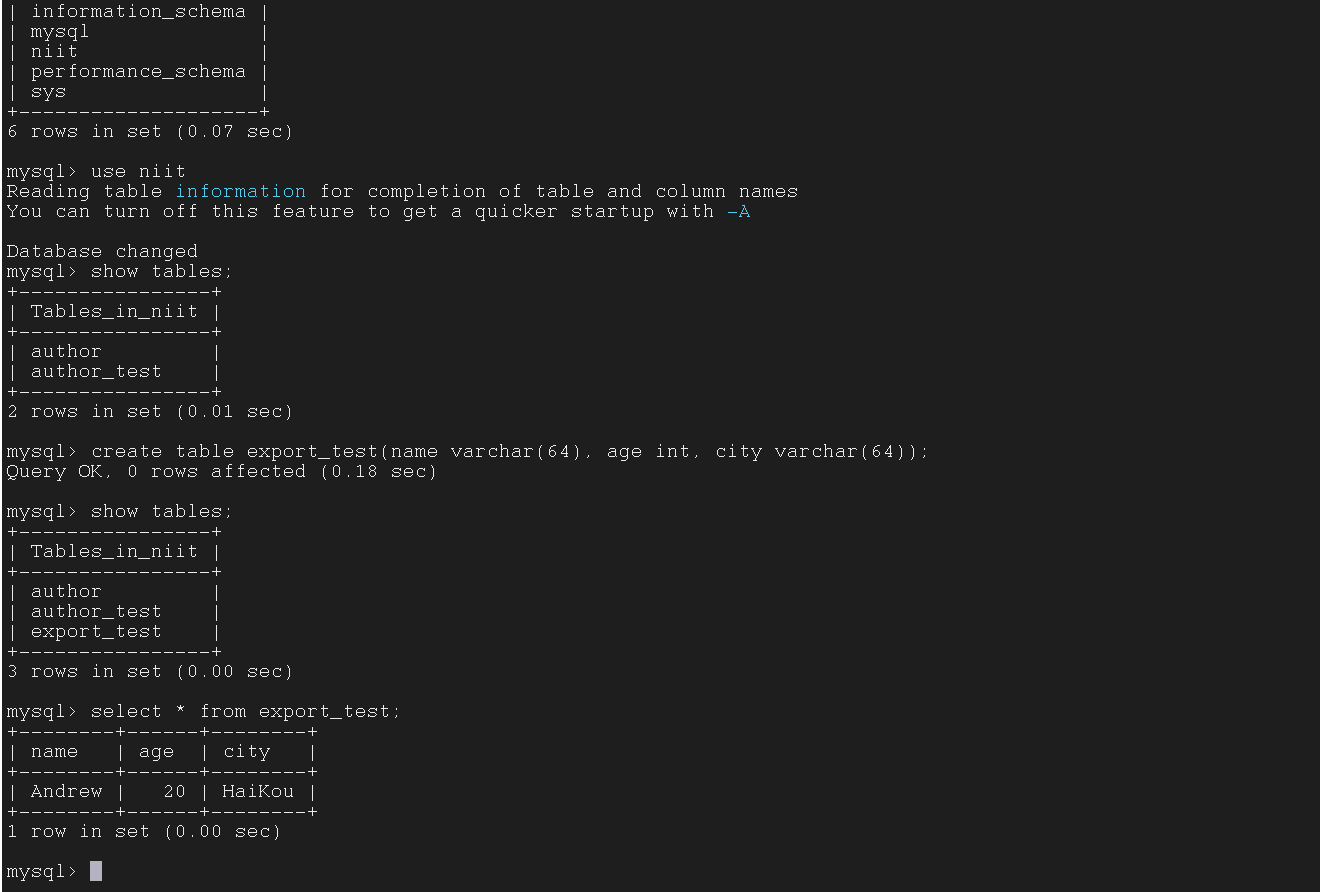
启动 MySQL, 新开一个窗口
进入 MySQL 中的数据库
在 MySQL 中新建表
1
| create table export_test(name varchar(64), age int, city varchar(64));
|
在 Hadoop 上运行下列命令 ( Sqoop 指令), 另开一个窗口
1
2
3
4
5
6
7
8
| $ sqoop export \
--connect jdbc:mysql://127.0.0.1:3306/niit \
--table export_test \
--username root --password 123456 \
--export-dir /user/hive/warehouse/niitbd3.db/export_test \
--m 1 \
--driver com.mysql.jdbc.Driver \
--input-fields-terminated-by ','
|
1
2
3
4
5
6
7
8
9
10
11
12
13
14
15
16
17
18
| $ sqoop export --connect \
jdbc:mysql://127.0.0.1:3306/niit \
--table export_test \
--username root --password 123456 \
--export-dir /user/hive/warehouse/niitbd3.db/export_test \
--m 1 \
--driver com.mysql.jdbc.Driver \
--input-fields-terminated-by ','
|
4.2 Export data to Windows MySQL
将 Linux 中 HDFS 的数据转到 Windows 中的 MySQL
先在 MySQL 中键入以下语句
1
2
3
4
| USE mysql; # 这个表是 mysql 自带的, 里面是用户信息之类的, 不用自己创建, 直接 use 进去就好
CREATE USER 'root'@'192.168.1.130' IDENTIFIED BY 'dcef1396dnf' ;
GRANT ALL ON *.* TO 'root'@'192.168.1.130';
FLUSH PRIVILEGES; # 授予全部权限
|
上面语句的解释
1
2
3
4
| USE mysql;
CREATE USER 'root'@'Linux 的 IP 地址' IDENTIFIED BY 'Windows 中 mysql 的密码' ;
GRANT ALL ON *.* TO 'root'@'Linux 的 IP 地址';
FLUSH PRIVILEGES;
|
在 Hive 中创建表并插入数据
1
2
| use niitbd3;
create table export_test (name string, age int, city string);
|
在 MySQL 中创建表,格式要跟 Hive 中要 export 出来的表一样
1
2
3
| create database test;
use test;
create table stu(name varchar(64), age int, city varchar(64));
|
在 Hadoop 中执行 sqoop 指令
1
2
3
4
5
6
7
8
| $ sqoop export \
--connect jdbc:mysql://192.168.1.1:3305/test \
--table stu \
--username root --password 123456 \
--export-dir /user/hive/warehouse/niitbd3.db/export_test \
--m 1 \
--driver com.mysql.jdbc.Driver \
--input-fields-terminated-by ','
|
1
2
3
4
5
6
7
8
9
10
11
12
13
14
15
16
17
18
19
| $ sqoop export \
--connect jdbc:mysql://192.168.1.1:3305/test \
--table stu \
--username root --password 123456 \
--export-dir /user/hive/warehouse/niitbd3.db/export_test \
--m 1 \
--driver com.mysql.jdbc.Driver \
--input-fields-terminated-by ','
|
4.3 Simple Export from HDFS txt to MySQL table
将 HDFS 中的 .txt 文件 export 到 MySQL 中
先来建两个 .txt 文件, 然后 copy 到虚拟机里
cust1.txt
1
2
3
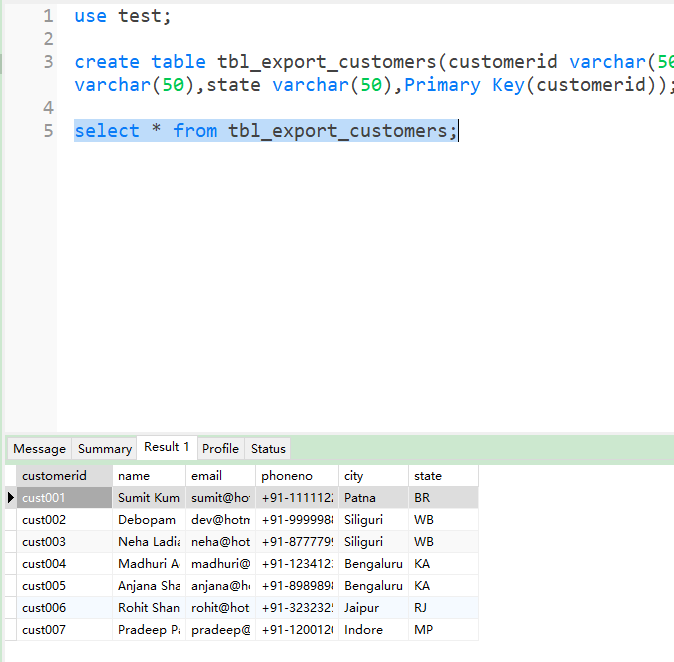
| cust001,Sumit Kumar,sumit@hotmail.com,+91-1111122222,Patna,BR
cust002,Debopam Mitra,dev@hotmail.com,+91-9999988888,Siliguri,WB
cust003,Neha Ladia,neha@hotmail.com,+91-8777799999,Siliguri,WB
|
cust2.txt
1
2
3
4
| cust004,Madhuri Achanala,madhuri@hotmail.com,+91-1234123412,Bengaluru,KA
cust005,Anjana Sharma,anjana@hotmail.com,+91-8989898989,Bengaluru,KA
cust006,Rohit Shankla,rohit@hotmail.com,+91-3232325454,Jaipur,RJ
cust007,Pradeep Patidar,pradeep@hotmail.com,+91-1200120000,Indore,MP
|
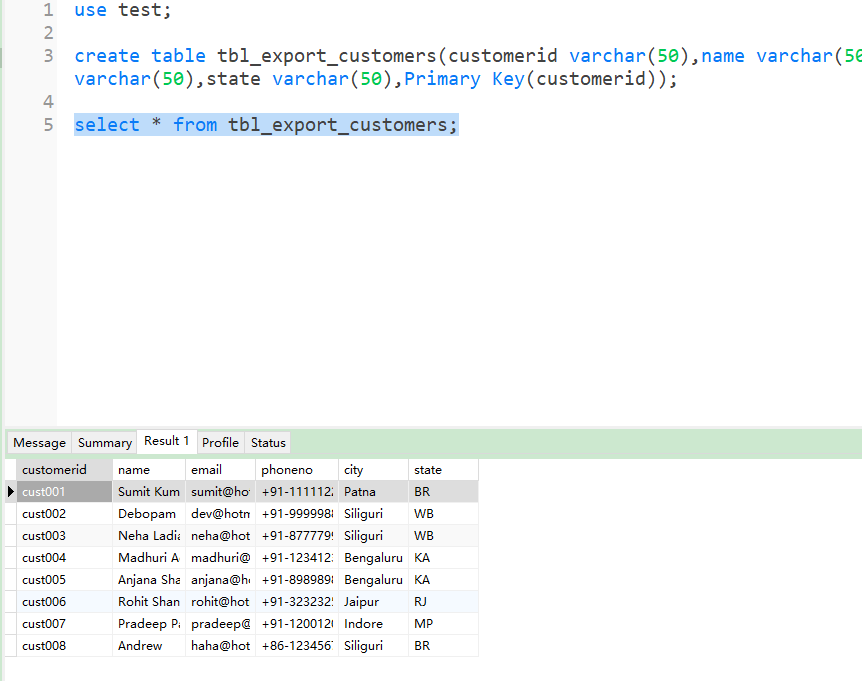
在 MySQL 中建表, 数据类型要与 .txt 文件中的类型相同
1
2
3
4
5
6
7
8
9
| create table tbl_export_customers(
customerid varchar(50),
name varchar(50),
email varchar(50),
phoneno varchar(50),
city varchar(50),
state varchar(50),
Primary Key(customerid)
);
|
然后在 HDFS 中创建目录
1
2
| $ hdfs dfs -mkdir /sqoop
$ hdfs dfs -mkdir /sqoop/data
|
把 Linux 中的 .txt 文件 copy 进 HDFS
1
2
| $ hdfs dfs -put /tools/sqoop_export_test/cust1.txt /sqoop/data
$ hdfs dfs -put /tools/sqoop_export_test/cust2.txt /sqoop/data
|
sqoop export 指令
这个指令没有另外两个参数, 但是可能会导致 export 之后的表中的数据属性对应不上
原因是因为 .txt 文件不是二进制文件, 而用来处理的 mapper 文件是二进制文件, 就可能会导致这个错误
1
2
3
4
5
6
| $ sqoop-export \
--connect jdbc:mysql://192.168.1.1:3305/test \
--username root --password 123456 \
--table tbl_export_customers \
--export-dir /sqoop/data \
--m 1
|
加上 --columns 参数, 这样就可以把属性分开, 不会出现上面的错误
1
2
3
4
5
6
7
| $ sqoop-export \
--connect jdbc:mysql://192.168.1.1:3305/test \
--username root --password 123456 \
--table tbl_export_customers \
--export-dir /sqoop/data \
--m 1 \
--columns 'customerid,name,email,phoneno,city,state'
|
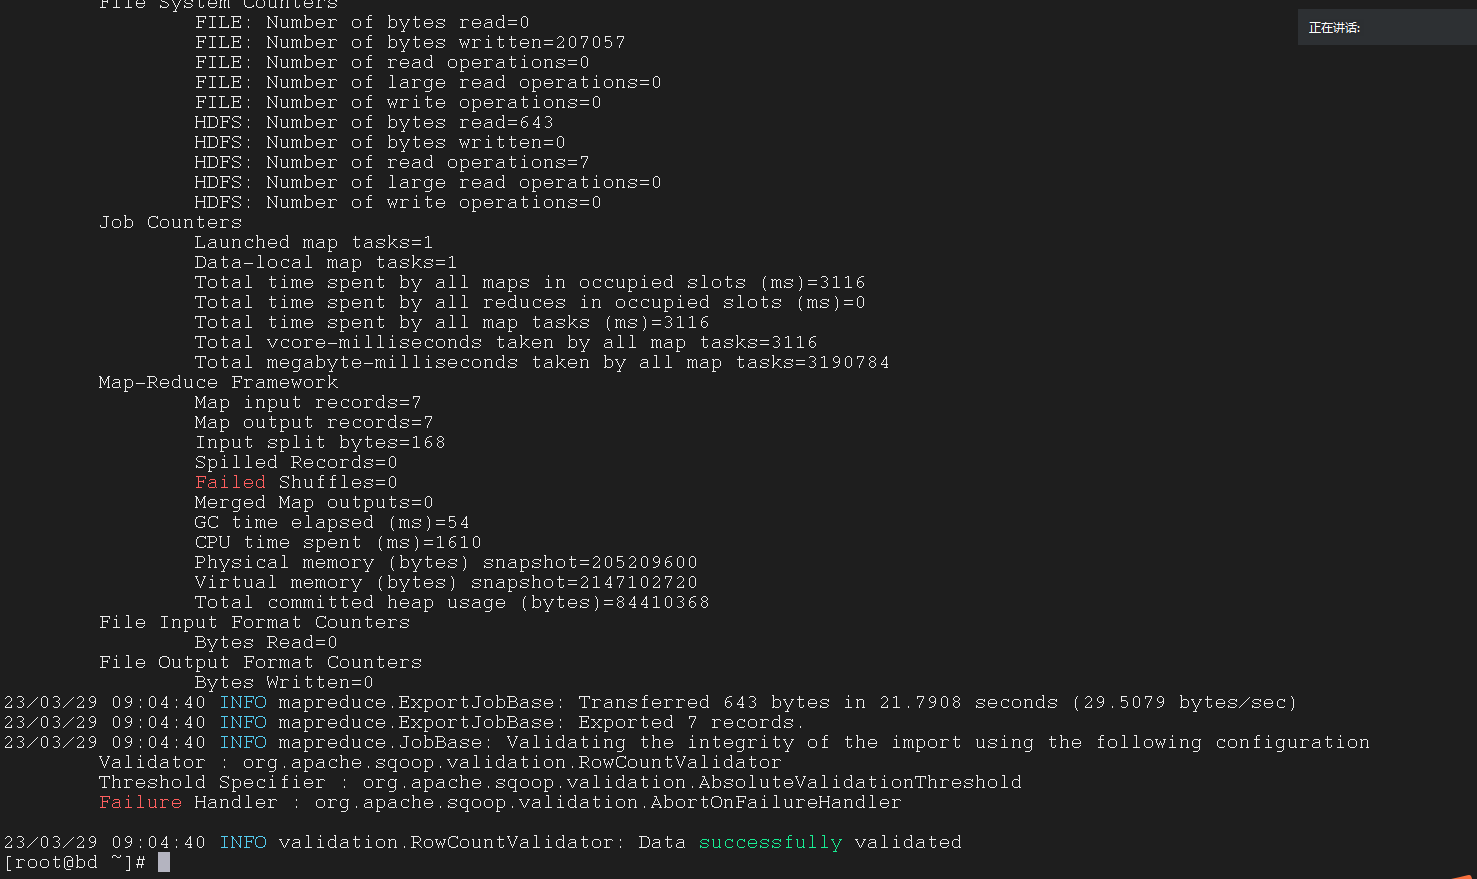
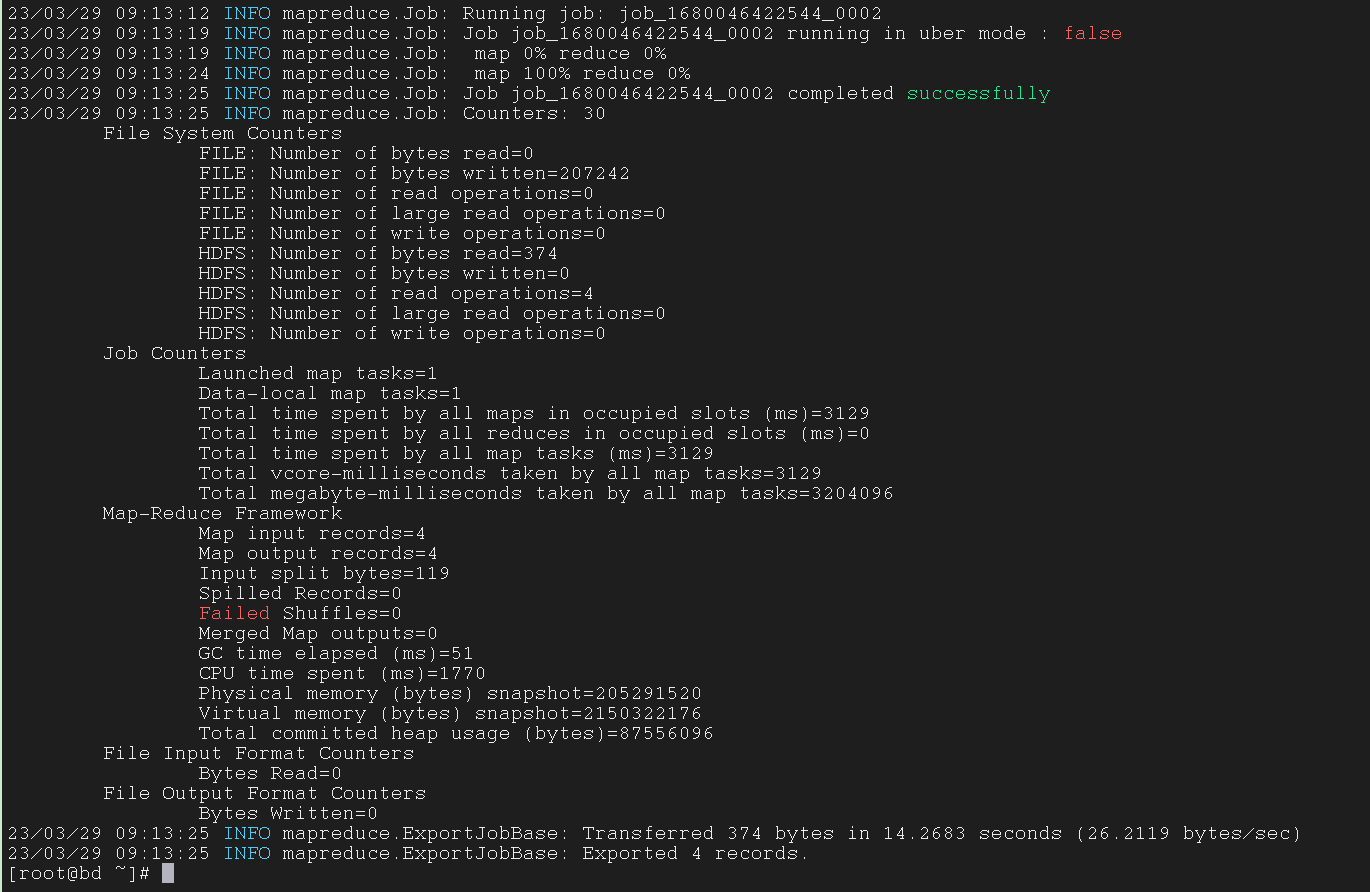
--validate 参数会在执行完指令之后的最后一行返回 data successfully validated, 这样就不用再特意去 MySQL 中验证了
1
2
3
4
5
6
7
8
| $ sqoop-export \
--connect jdbc:mysql://192.168.1.1:3305/test \
--username root --password 123456 \
--table tbl_export_customers \
--export-dir /sqoop/data \
--m 1 \
--columns 'customerid,name,email,phoneno,city,state' \
-–validate
|
1
2
3
4
5
6
7
8
9
10
| $ sqoop-export \
--connect jdbc:mysql://192.168.1.1:3305/test \
--username root --password 123456 \
--table tbl_export_customers \
--export-dir /sqoop/data \
--m 1 \
--columns 'customerid,name,email,phoneno,city,state' \
-–validate
|
4.4 Export from HDFS txt to MySQL table after updateion in txt file on HDFS On Linux
将 HDFS 中的文件更新后 export 到 MySQL 中
我们不能通过以下指令直接更新 HDFS 中的 .txt 文件, 只能通过更新操作来修改
1
| $ hdfs dfs -vi /sqoop/cust1.txt
|
把 Linux 中的 .txt 文件修改一下
1
| vi /tools/sqoop_export_test/cust1.txt
|
在 HDFS 中创建目录
1
| $ hdfs dfs -mkdir /sqoop_updated
|
将修改后的 .txt 文件 put 进 HDFS 的新建文件夹
1
| $ hdfs dfs -put /tools/cust1.txt /sqoop_updated
|
执行 sqoop 指令
1
2
3
4
5
6
7
8
9
10
| $ sqoop-export \
--connect jdbc:mysql://192.168.1.1:3305/test \
--username root \
--password 123456 \
--table tbl_export_customers \
--export-dir /sqoop_updated \
--update-key customerid \
--m 1 \
--update-mode alowinsert \
--columns 'customerid,name,email,phoneno,city,state'
|
1
2
3
4
5
6
7
8
9
10
11
12
13
14
15
16
17
18
19
| $ sqoop-export \
--connect jdbc:mysql://192.168.1.1:3305/test \
--username root \
--password 123456 \
--table tbl_export_customers \
--export-dir /sqoop_updated \
--update-key customerid \
--m 1 \
--update-mode alowinsert \
--columns 'customerid,name,email,phoneno,city,state'
|
4.5 Exporting data Call Mode On Mysql
通过调用 (过程) 模式进行 export
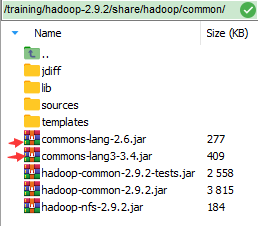
先将这两个 jar 包放入这个路径
在 MySQL 中建两个表
1
2
3
| create table user(id int NOT NULL, name VARCHAR(20) NOT NULL,PRIMARY KEY(id));
CREATE TABLE goods (id int NOT NULL,name VARCHAR(50) NOT NULL,price int,PRIMARY KEY(id));
|
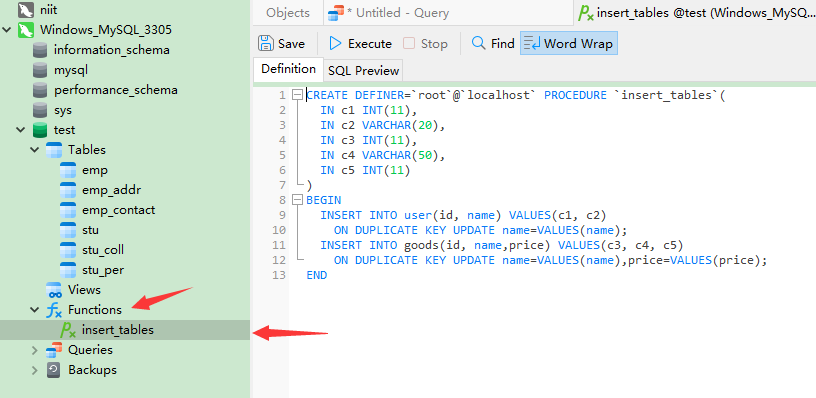
在 MySQL 中新建一个过程
这个过程就相当于一个函数, 想干啥直接调用函数就行了
我还纳闷用 sqoop 指令怎么执行这么复杂的东西, 原来如此
1
2
3
4
5
6
7
8
9
10
11
12
13
14
15
| delimiter $$
CREATE PROCEDURE insert_tables (
IN c1 INT(11),
IN c2 VARCHAR(20),
IN c3 INT(11),
IN c4 VARCHAR(50),
IN c5 INT(11)
)
BEGIN
INSERT INTO user(id, name) VALUES(c1, c2)
ON DUPLICATE KEY UPDATE name=VALUES(name);
INSERT INTO goods(id, name,price) VALUES(c3, c4, c5)
ON DUPLICATE KEY UPDATE name=VALUES(name),price=VALUES(price);
END$$
delimiter ;
|
建个 order.txt 文件
1
2
3
4
5
6
| 10001|Tom|1023|ITEM23|23
10002|Jerry|1023|ITEM23|23
10002|Jerry|1024|ITEM24|24
10003|Spike|1023|ITEM23|23
10003|Spike|1024|ITEM24|24
10003|Spike|1025|ITEM25|25
|
然后 copy 进 HDFS
1
| $ hdfs dfs -put /tools/sqoop_export_test/order.txt /sqoop
|
执行 sqoop 指令
1
2
3
| $ sqoop-export --connect jdbc:mysql://192.168.1.1:3305/test --username root --password dcef1396dnf --call insert_tables --export-dir /sqoop --fields-terminated-by '|'
$ sqoop-export --connect jdbc:mysql://192.168.1.1:3305/test --username root --password dcef1396dnf --call insert_tables --export-dir /sqoop --fields-terminated-by '|'
|
4.6 Other Export
4.6.1 Exporting files under HDFS directory to a table
导出 HDFS 目录下的文件到表中
1
2
3
4
5
| $ sqoop export \
--connect jdbc:mysql://192.168.1.1:3305/test \
--username root --password 123456 \
--table cities \
--export-dir cities
|
1
2
3
4
5
6
7
8
9
| $ sqoop export \
--connect jdbc:mysql://192.168.1.1:3305/test \
--username root --password 123456 \
--table cities \
--export-dir cities
|
4.6.2 Batch Inserts Export
批量插入导出
1
2
3
4
5
6
| $ sqoop export \
--connect jdbc:mysql://192.168.1.1:3305/test \
--username root --password 123456 \
--table cities \
--export-dir cities \
--batch
|
1
2
3
4
5
6
7
8
9
10
11
| $ sqoop export \
--connect jdbc:mysql://192.168.1.1:3305/test \
--username root --password 123456 \
--table cities \
--export-dir cities \
--batch
|
4.6.3 Updating existing Data set
更新已有数据集
1
2
3
4
5
| $ sqoop export \
--connect jdbc:mysql://192.168.1.1:3305/test \
--username root --password 123456 \
--table cities \
--update-key id
|
1
2
3
4
5
6
7
8
| $ sqoop export \
--connect jdbc:mysql://192.168.1.1:3305/test \
--username root --password 123456 \
--table cities \
--update-key id
|
4.6.4 Upsert Export
翻转导出
1
2
3
4
5
6
| $ sqoop export \
--connect jdbc:mysql://192.168.1.1:3305/test \
--username root --password 123456 \
--table cities \
--update-key id \
--update-mode allowinsert
|
1
2
3
4
5
6
7
8
9
10
11
| $ sqoop export \
--connect jdbc:mysql://192.168.1.1:3305/test \
--username root --password 123456 \
--table cities \
--update-key id \
--update-mode allowinsert
|
4.6.5 Column Export
按列导出
1
2
3
4
5
| $ sqoop export \
--connect jdbc:mysql://192.168.1.1:3305/test \
--username root --password 123456 \
--table cities \
--columns country,city
|
1
2
3
4
5
6
7
8
9
| $ sqoop export \
--connect jdbc:mysql://192.168.1.1:3305/test \
--username root --password 123456 \
--table cities \
--columns country,city
|
五、其他 Sqoop 工具
如何创建 job
1
2
3
4
5
6
7
| $ sqoop job \
--create myjob \
-- import \
--connect jdbc:mysql://192.168.1.1:3305/test \
--username root --password-file file:///tools/.mysql_password.password \
--table actor \
--target-dir /sqoopjob1
|
1
2
3
4
5
6
7
8
9
10
11
12
13
14
15
16
17
18
| $ sqoop job \
--create myjob \
-- import \
--connect jdbc:mysql://192.168.1.1:3305/test \
--username root --password-file file:///tools/.mysql_password.password \
--table actor \
--target-dir /sqoopjob1
|

5.1.2 list all saved jobs
展示所有 job

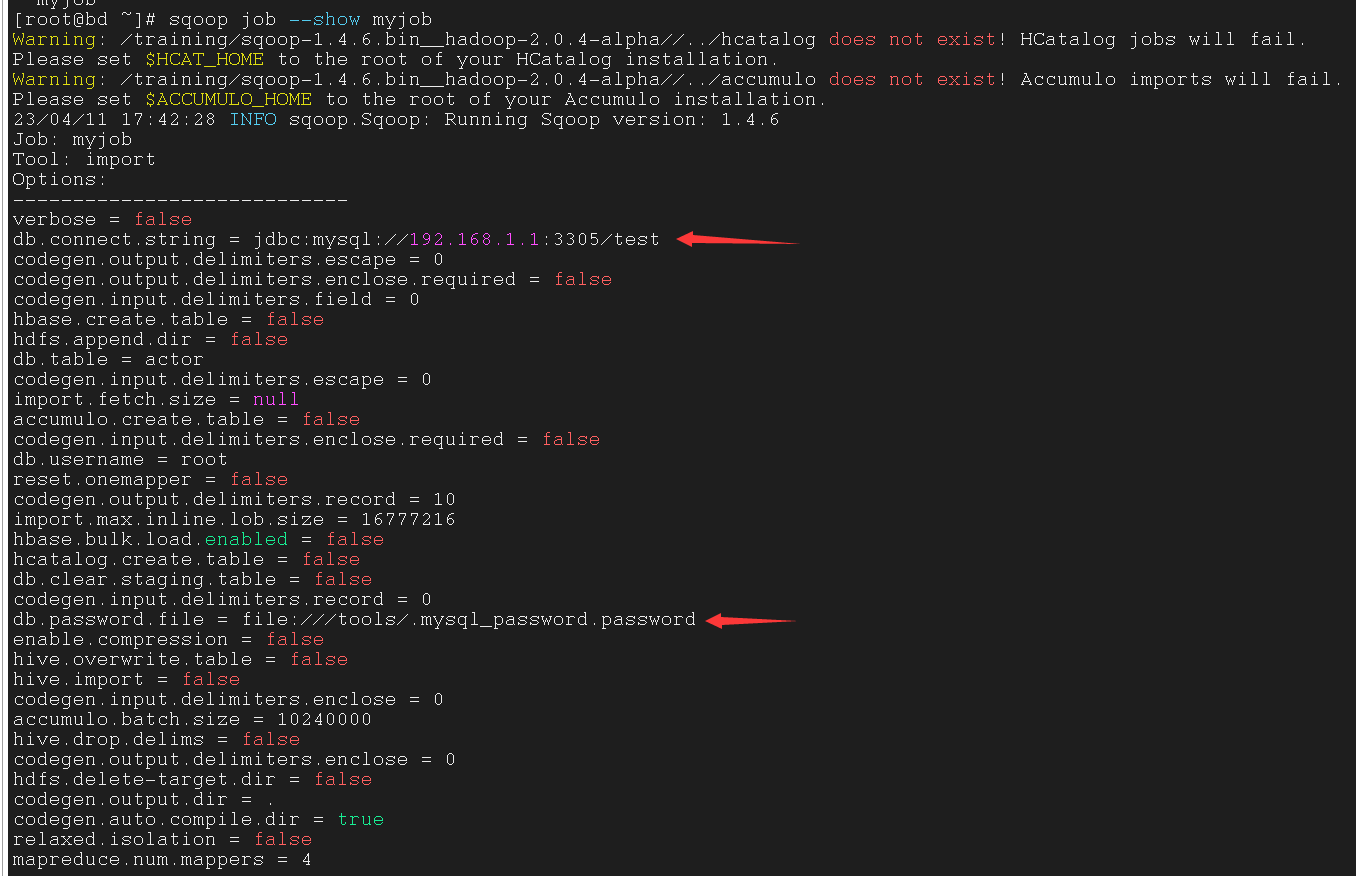
5.1.3 inspect the configuration of a job with the show action
使用 --show 参数展示某个 job 的配置
1
| $ sqoop job --show myjob
|
这里如果没有用密码文件的话在配置里就不会显示密码
而且每次执行这个 job 的时候都会询问你密码
5.1.4 run the job with –exec
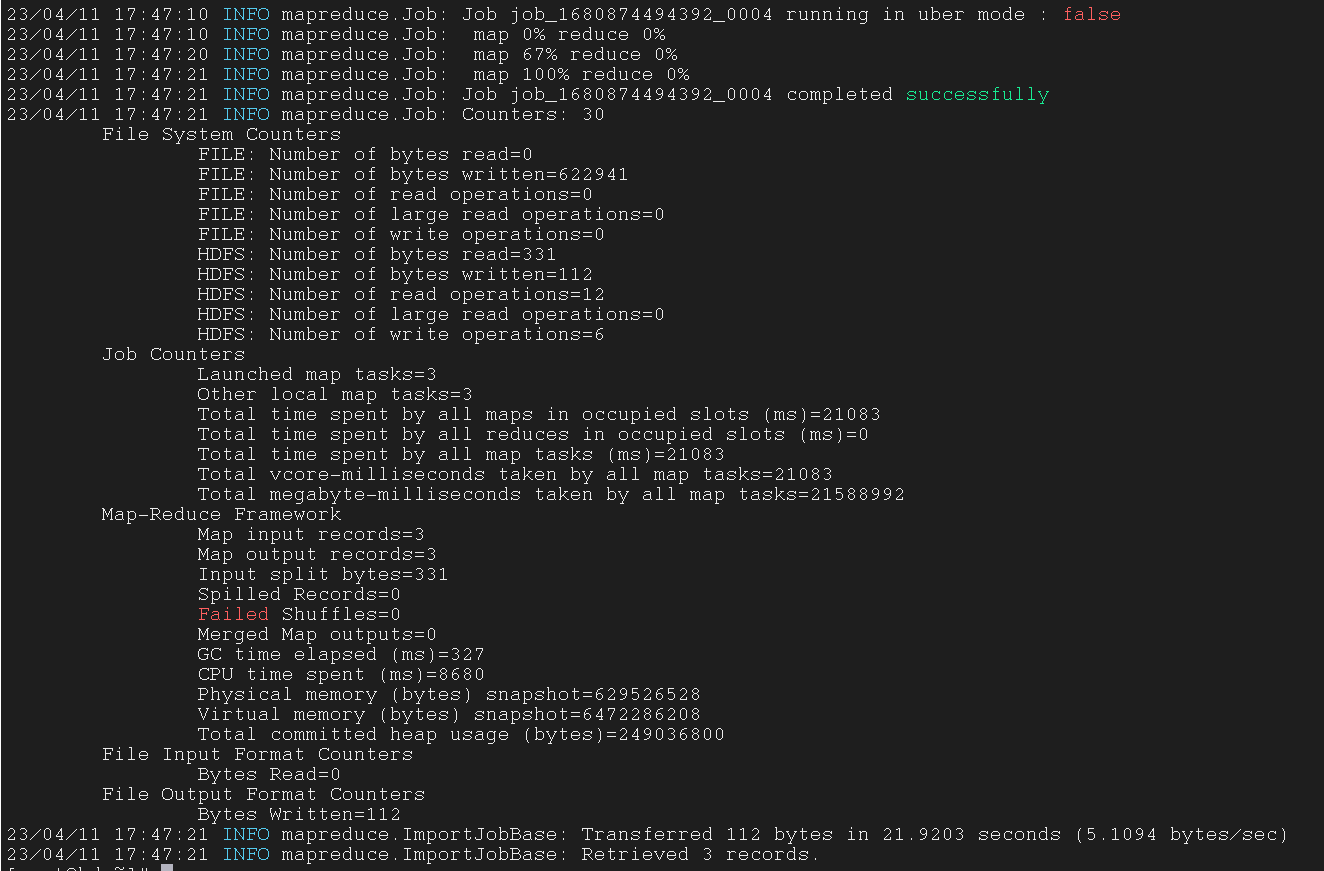
使用 --exec 参数执行某个 job
exec 其实就是 execute(执行)
1
| $ sqoop job --exec myjob
|
5.1.5 Check the output on HDFS (/user/root or specified target dir)
查看在 HDFS 中某个路径的输出(在 job 中设置的 --target-dir 或者默认路径)
1
| $ hdfs dfs -cat /sqoopjob1/part-m-*
|

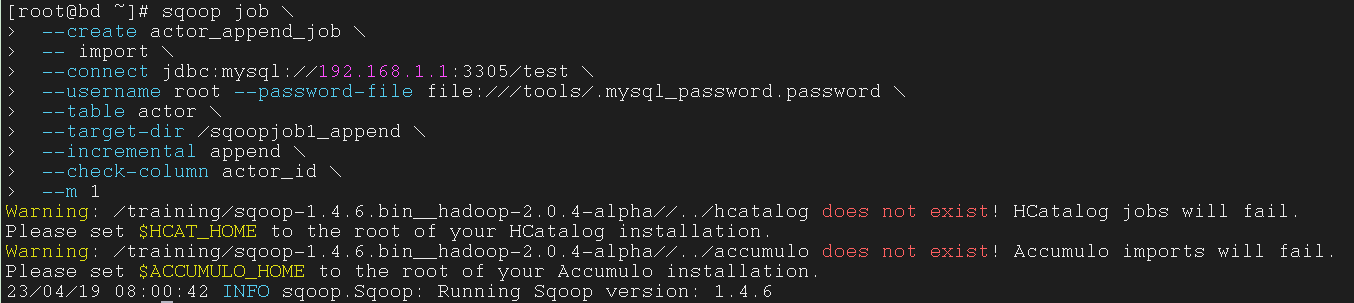
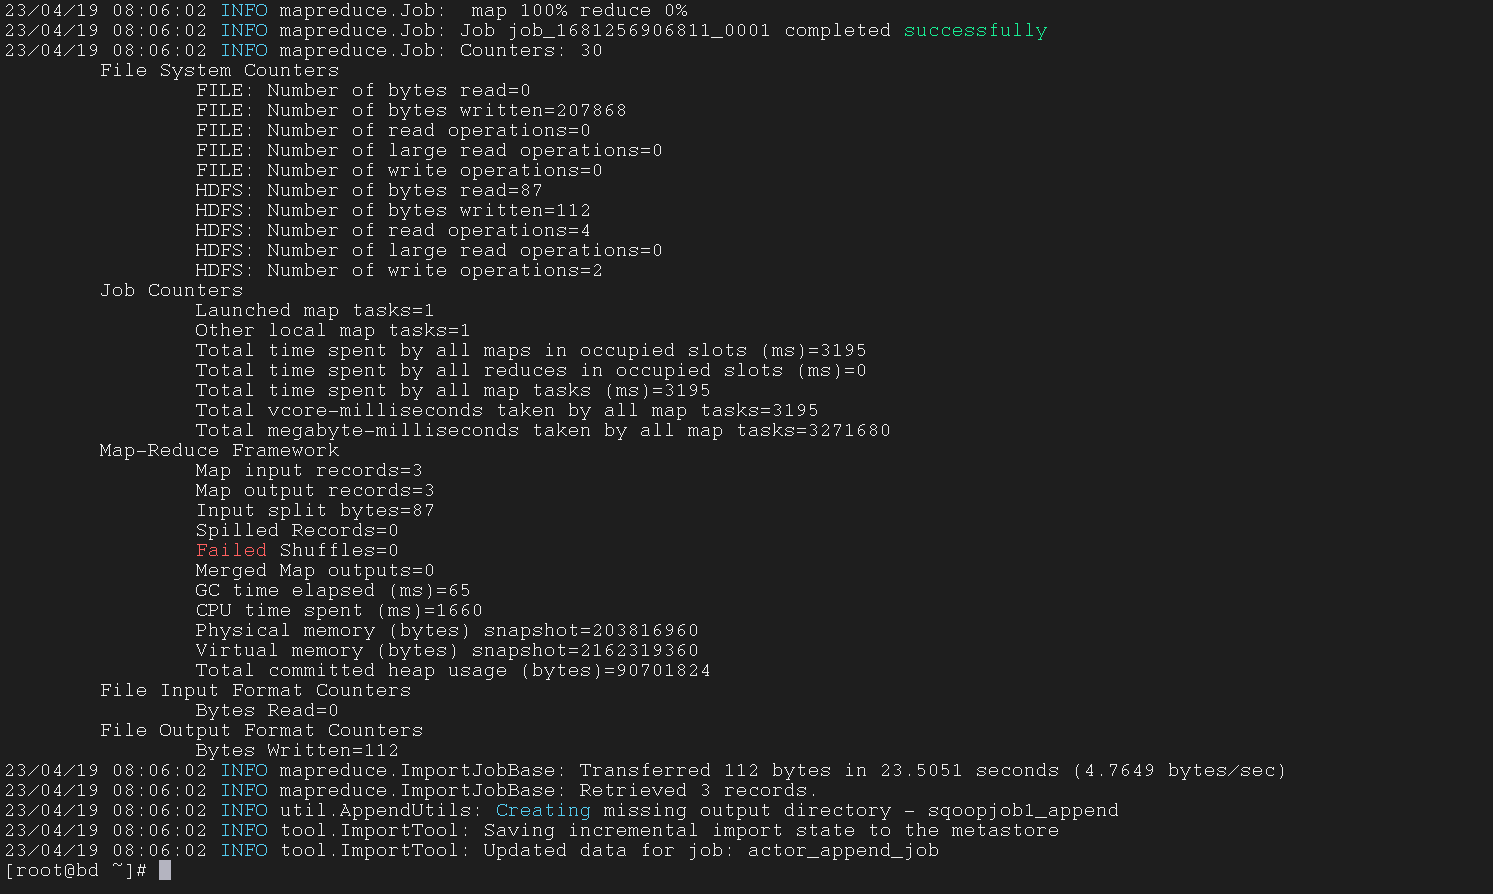
创建增量导入(Incremental Import)的 job
1
2
3
4
5
6
7
8
9
10
| $ sqoop job \
--create actor_append_job \
-- import \
--connect jdbc:mysql://192.168.1.1:3305/test \
--username root --password-file file:///tools/.mysql_password.password \
--table actor \
--target-dir /sqoopjob1_append \
--incremental append \
--check-column actor_id \
--m 1
|
5.1.7 list all saved jobs
展示所有已经创建的 Job

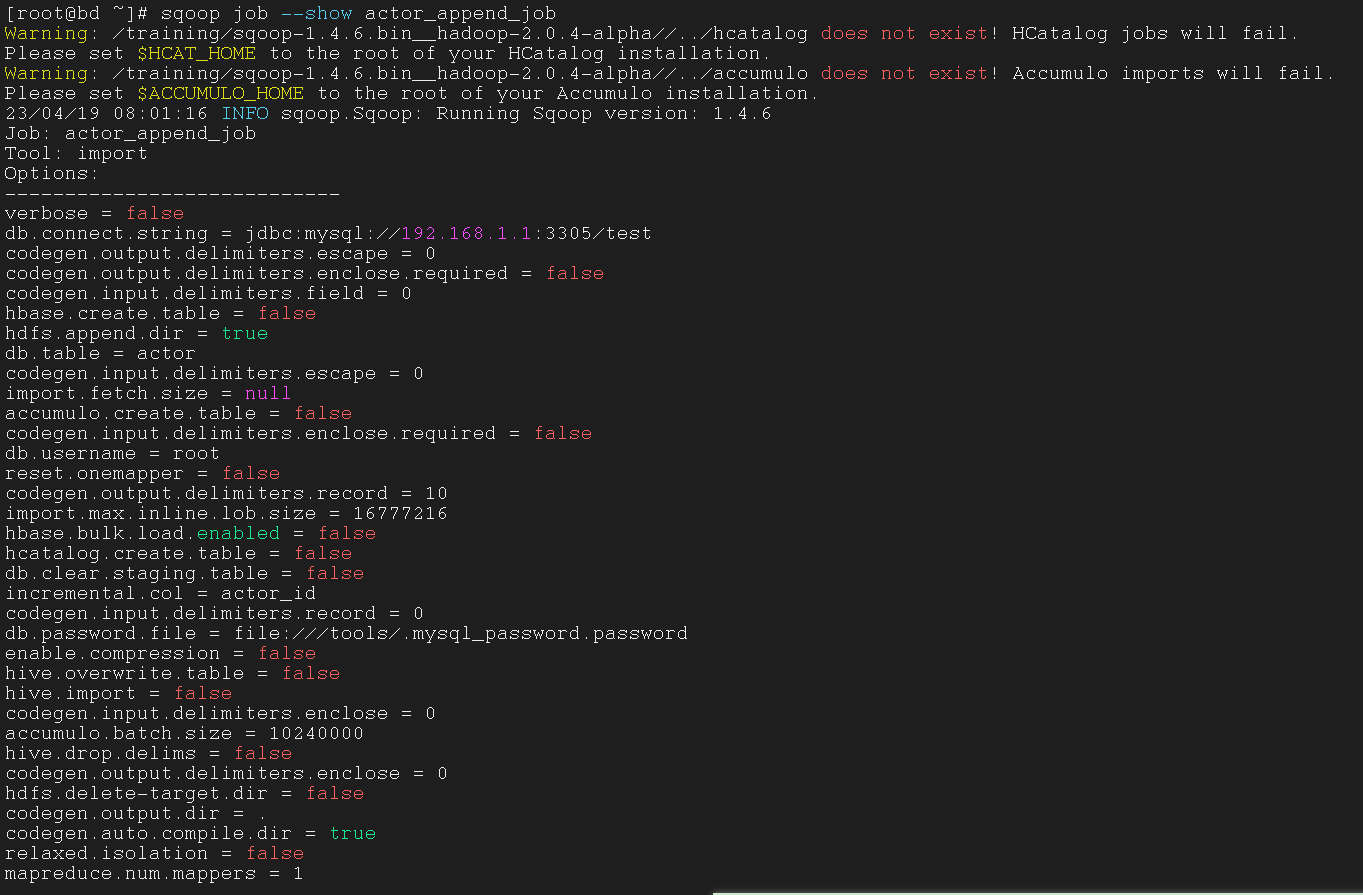
5.1.8 inspect the configuration of a job with the show action
使用 show 操作查看 Job 的配置
1
| $ sqoop job --show actor_append_job
|
5.1.9 run the job with –exec
使用 --exec 参数运行 Job
--exec 是单词 executive(运行) 的缩写
1
| $ sqoop job --exec actor_append_job
|
5.1.10 Check the output on HDFS (specified target dir)
指定目标路径来在 HDFS 上检查输出
1
| $ hdfs dfs -cat /sqoopjob1_append/part-m-*
|

5.1.11 Add some new records
添加一些新纪录
1
2
3
4
| $ sqoop-eval \
--connect jdbc:mysql://192.168.1.1:3305/test \
--username root --password-file file:///tools/.mysql_password.password \
--query "insert into actor(first_name,last_name) value('JOE','SWANK'),('CHRISTION','GABLE'),('ZERO','CAGE')"
|

5.1.12 run the job with –exec
使用 --exec 参数来运行 Job
1
| $ sqoop job --exec actor_append_job
|
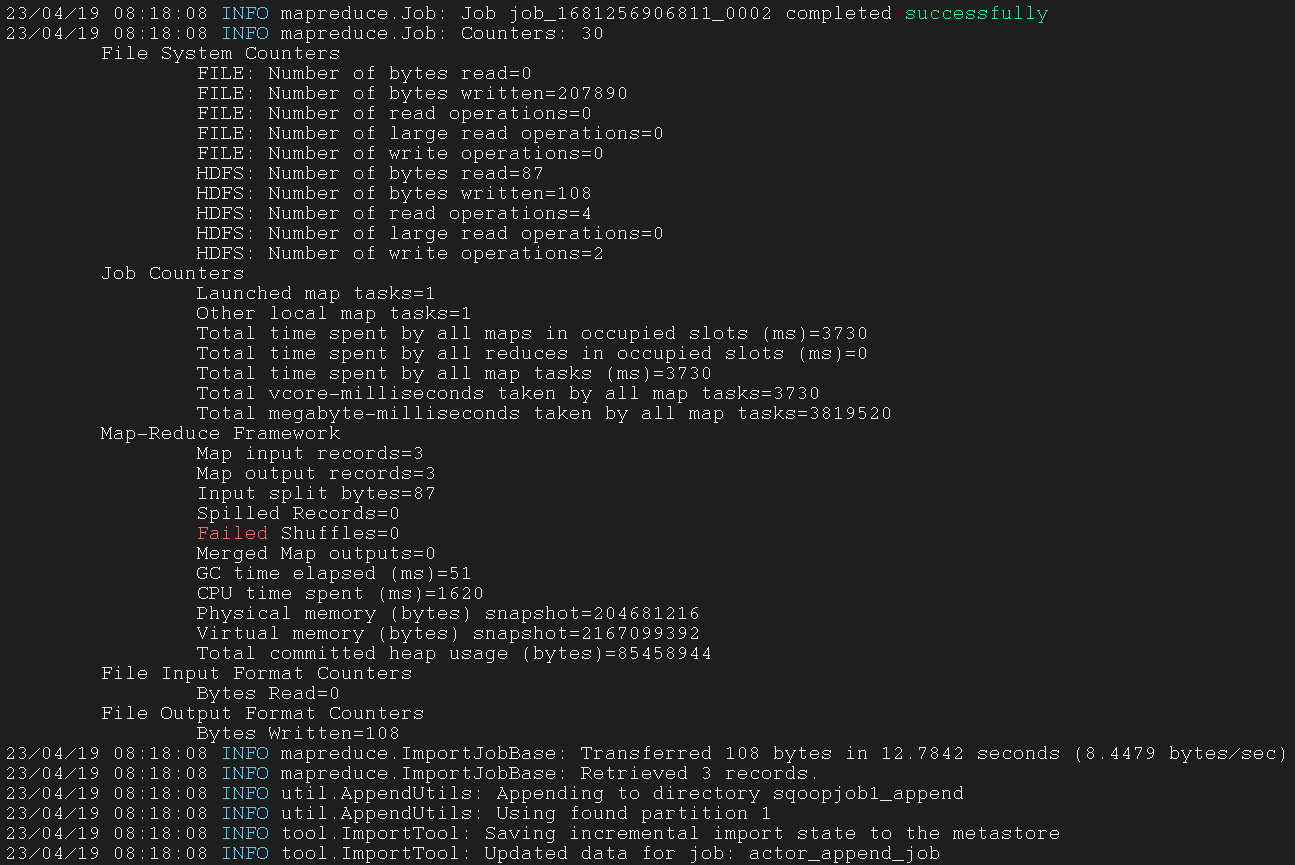
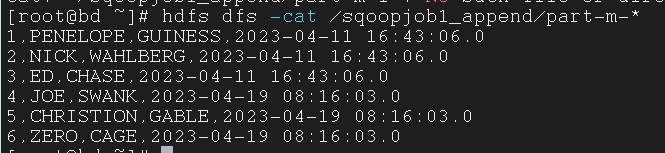
5.1.13 Check the output on HDFS (specified target dir)
指定目标路径来在 HDFS 上检查输出
1
| $ hdfs dfs -cat /sqoopjob1_append/part-m-*
|
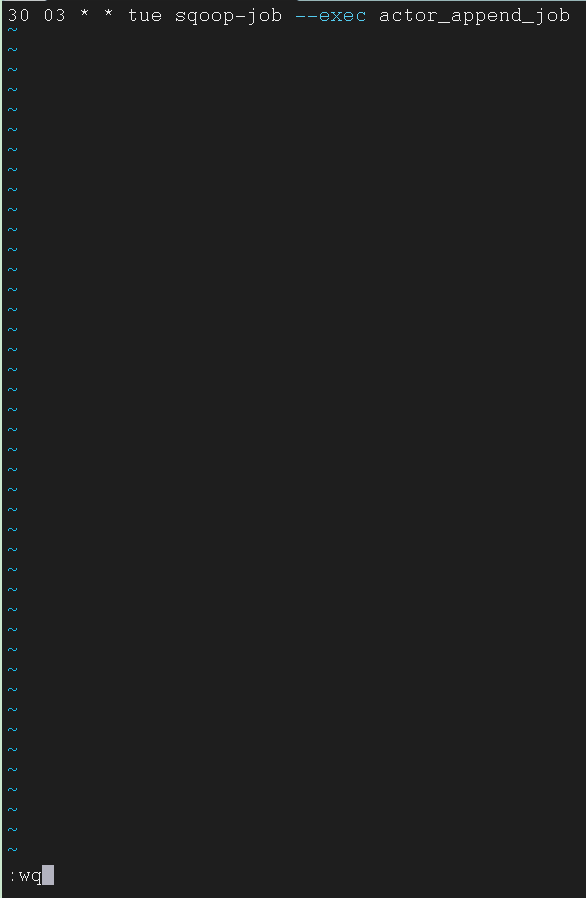
5.1.14 Set the saved job as a scheduled task
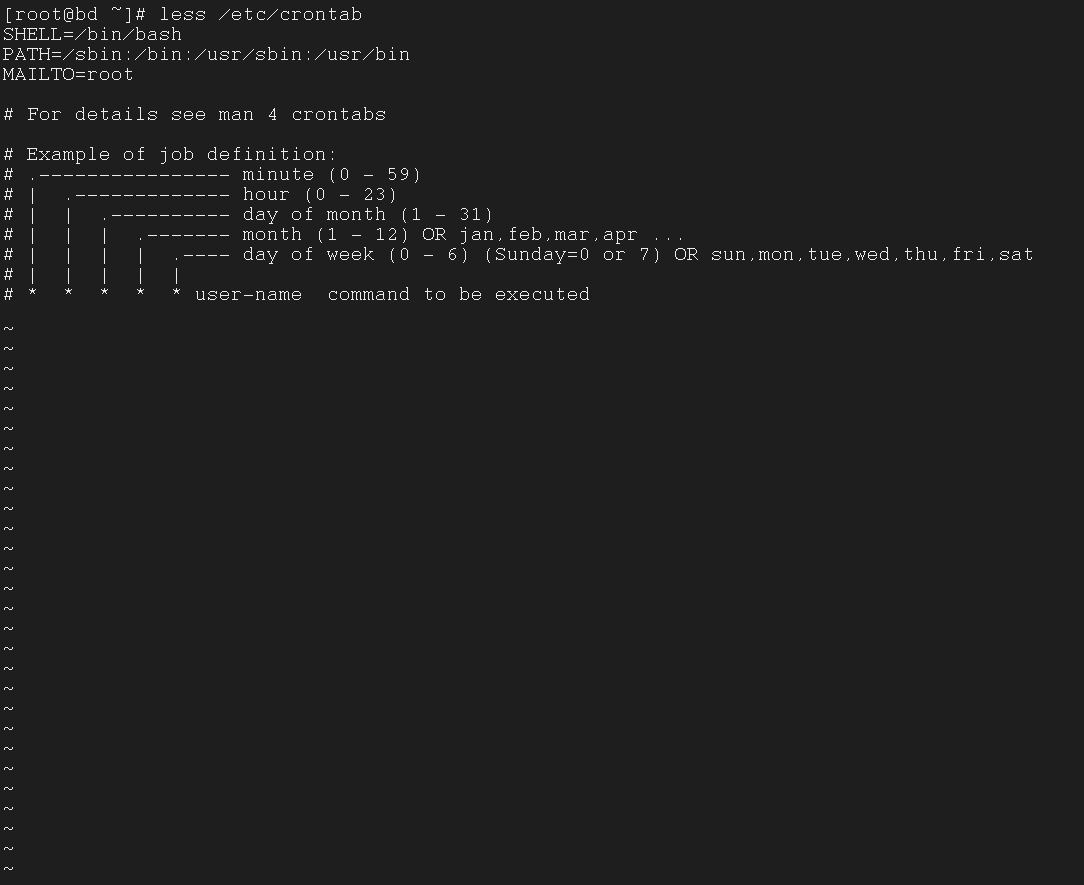
关于 crontab
这里解释一下 Linux 中的 crontab 文件
这个指令是在 Linux 系统中带有的文件,并非 Sqoop 或 Hadoop 专属
这个指令可以上我们在指定时间(包括哪月哪周哪日哪小时哪分钟)周期性地运行我们预定的指令
crontab 的文件格式
{minute} {hour} {day-of-month} {month} {day-of-week} {full-path-to-shell-script}
minute 区间为 0 - 59hour 区间为 0 - 23day-of-month 区间为 0 - 31month 区间为 1 - 12day-of-week 区间为 0 - 7,或者英文单词的前三个字母full-path-to-shell-script 要运行的完整指令
修改 crontab 文件
显示 crontab 文件
删除 crontab 文件
删除 crontab 文件,在删除之前提醒用户
将保存的 Job 设置为日常 Job
1
| 30 03 * * tue sqoop-job --exec actor_append_job
|
再来看看修改之后的文件

展示 root 用户的 crontab 内容
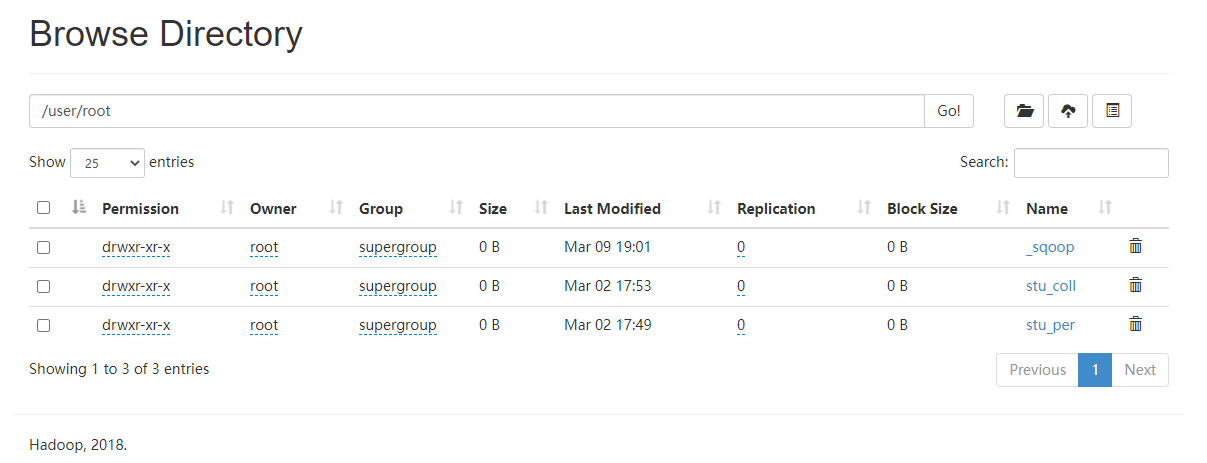
merge 工具可以让我们将 MapReduce 中的所选择的/所有的 mapper 文件合并为一个 reduce 文件
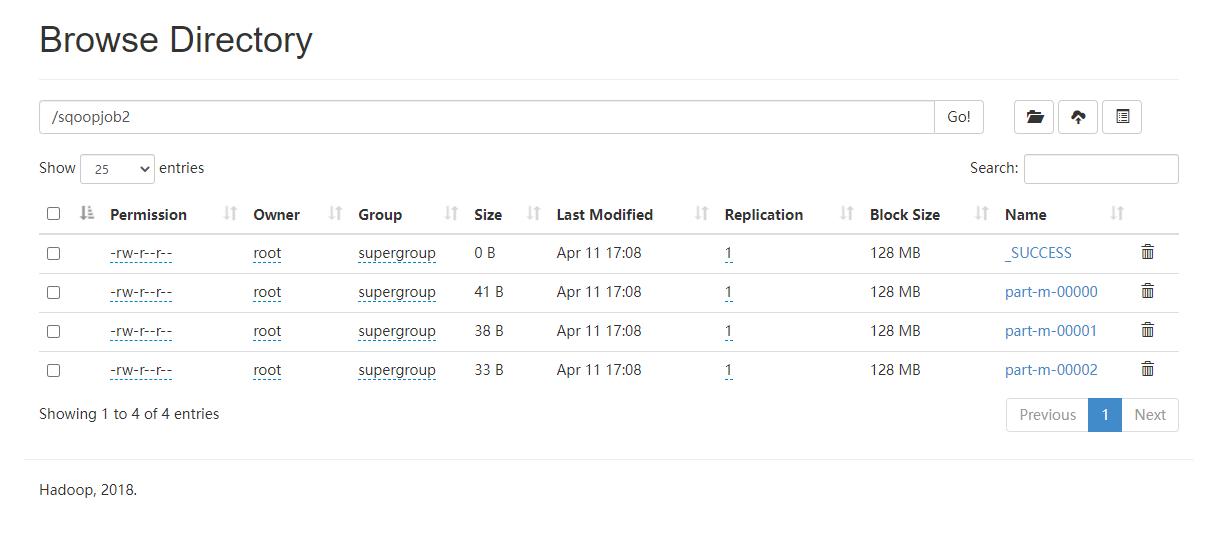
5.2.1 check the files in HDFS path /sqoopjob2
在开始之前,我们得把这个表 import 到 MapReduce
1
2
3
4
5
6
| $ sqoop import \
--connect jdbc:mysql://192.168.1.1:3305/test \
--username root --password-file file:///tools/.mysql_password.password \
--table actor \
--target-dir /sqoopjob2 \
--m 3
|

然后我们来看看这个 MapReduce 路径下都有啥文件
1
| $ hdfs dfs -ls /sqoopjob2
|

5.2.2 generate the corresponding jar file
生成相应的 jar 文件
1
2
3
4
5
| $ sqoop-codegen \
--connect jdbc:mysql://192.168.1.1:3305/test \
--username root --password-file file:///tools/.mysql_password.password \
--table actor \
--bindir /tools/codegen
|
1
2
3
4
5
6
7
8
9
10
11
| $ sqoop-codegen \
--connect jdbc:mysql://192.168.1.1:3305/test \
--username root --password-file file:///tools/.mysql_password.password \
--table actor \
--bindir /tools/codegen
|
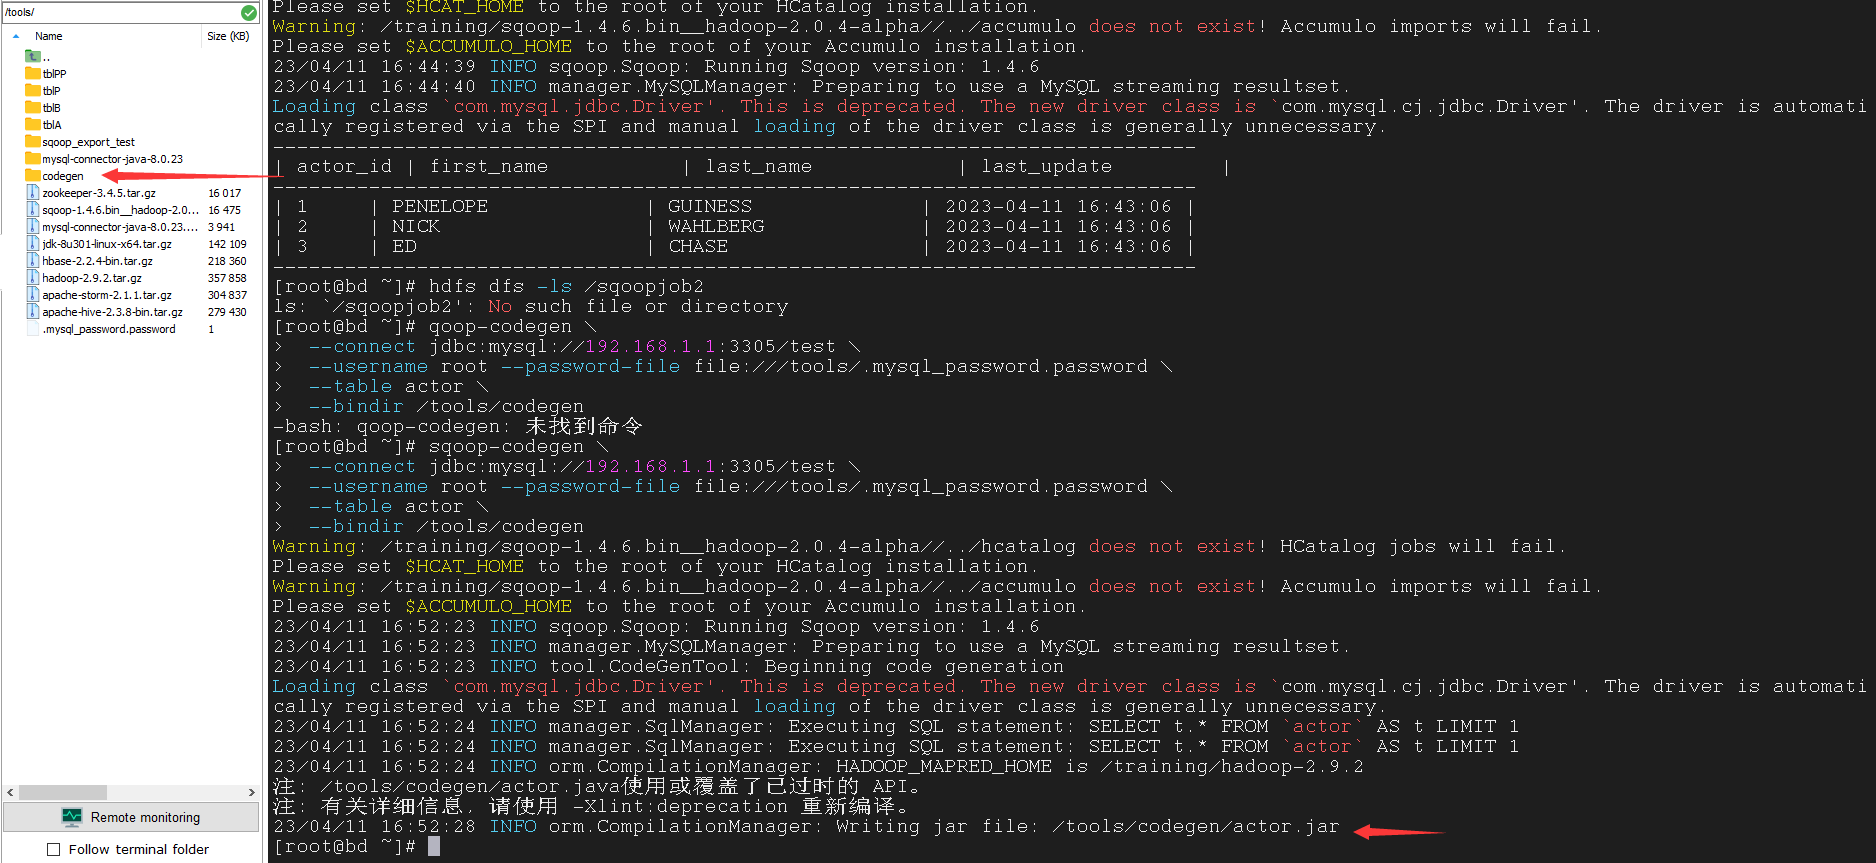
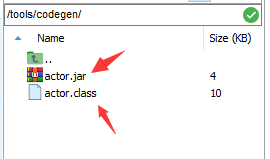
生成的代码文件可以在 /tools/codegen 中找到

使用 sqoop-merge 工具将新增量导入的文件与旧文件合并
1
2
3
4
5
6
7
| $ sqoop-merge \
--new-data /sqoopjob2/part-m-00001 \
--onto /sqoopjob2/part-m-00000 \
--target-dir /sqoopjob2-merged \
--jar-file /tools/codegen/actor.jar \
--class-name actor \
--merge-key actor_id
|
1
2
3
4
5
6
7
8
9
10
11
12
13
14
15
16
17
18
19
20
21
| $ sqoop-merge \
--new-data /sqoopjob2/part-m-00001 \
--onto /sqoopjob2/part-m-00000 \
--target-dir /sqoopjob2-merged \
--jar-file /tools/codegen/actor.jar \
--class-name actor \
--merge-key actor_id
|
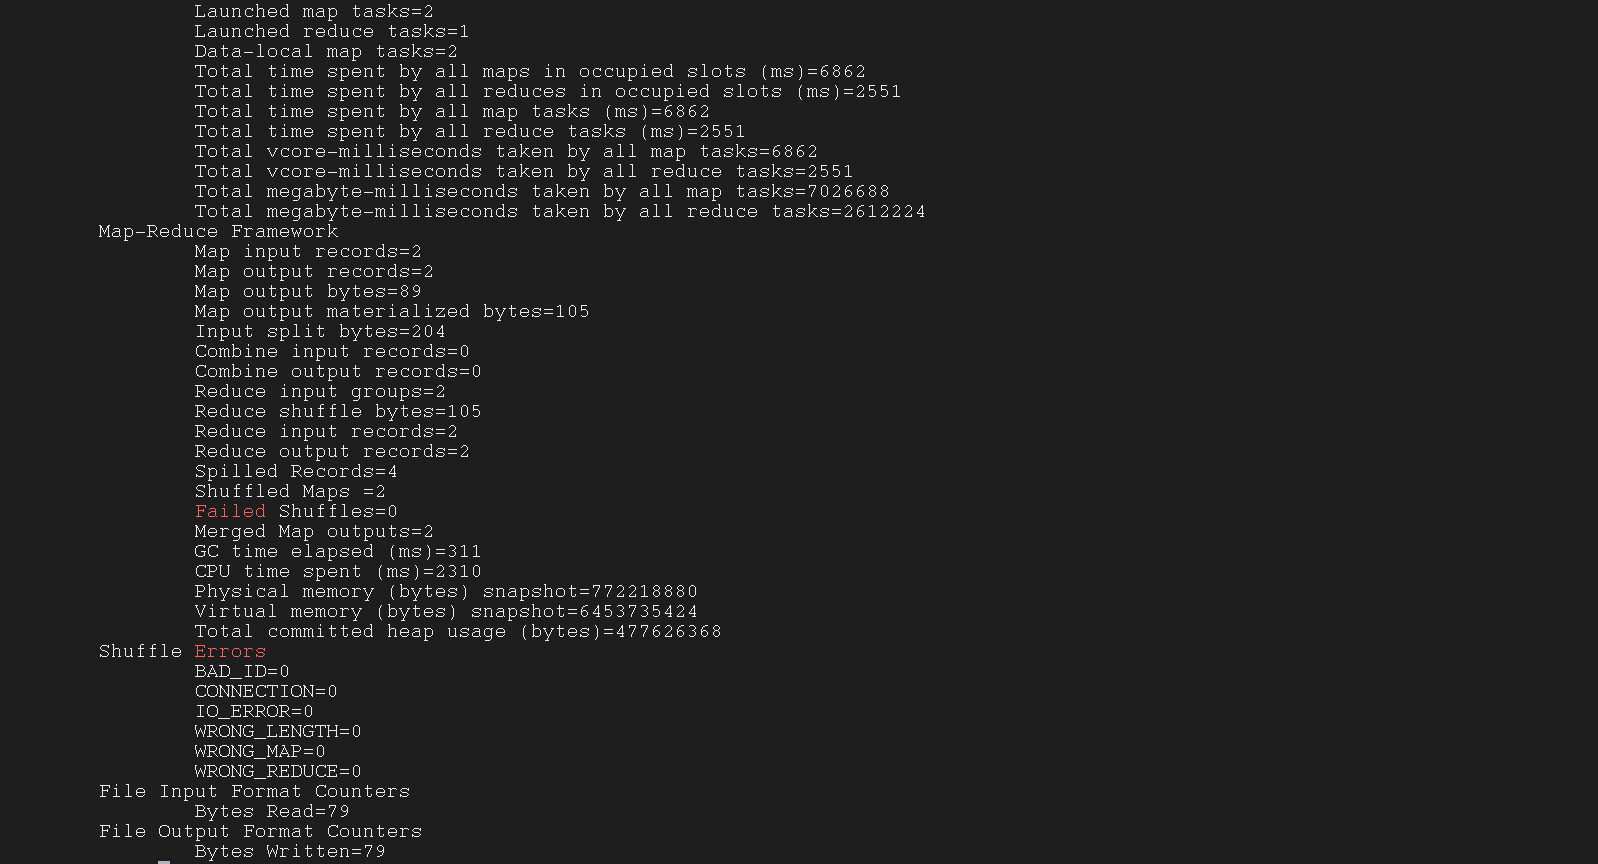
5.2.5 Verification
检验是否合并成功
1
| $ hdfs dfs -cat /sqoopjob2-merged/part-r-*
|
sqoop-eval 可以让我们再 Sqoop 指令中使用 MySQL语句
没错,可以使用所有 MySQL 语句,从此摆脱 Navicat(doge)
使用 eval 工具展示所有数据库
1
2
3
4
| $ sqoop-eval \
--connect jdbc:mysql://192.168.1.1:3305 \
--username root --password-file file:///tools/.mysql_password.password \
--query "show databases;"
|
1
2
3
4
5
6
7
| $ sqoop-eval \
--connect jdbc:mysql://192.168.1.1:3305 \
--username root --password-file file:///tools/.mysql_password.password \
--query "show databases;"
|

使用 eval 工具创建表
1
2
3
4
| $ sqoop-eval \
--connect jdbc:mysql://192.168.1.1:3305/test \
--username root --password-file file:///tools/.mysql_password.password \
--query "CREATE TABLE actor (actor_id smallint(5) unsigned NOT NULL AUTO_INCREMENT, first_name varchar(45) NOT NULL, last_name varchar(45) NOT NULL, last_update timestamp NOT NULL DEFAULT CURRENT_TIMESTAMP ON UPDATE CURRENT_TIMESTAMP,PRIMARY KEY (actor_id)) ENGINE=InnoDB;"
|
1
2
3
4
5
6
7
| $ sqoop-eval \
--connect jdbc:mysql://192.168.1.1:3305/test \
--username root --password-file file:///tools/.mysql_password.password \
--query "CREATE TABLE actor (actor_id smallint(5) unsigned NOT NULL AUTO_INCREMENT, first_name varchar(45) NOT NULL, last_name varchar(45) NOT NULL, last_update timestamp NOT NULL DEFAULT CURRENT_TIMESTAMP ON UPDATE CURRENT_TIMESTAMP,PRIMARY KEY (actor_id)) ENGINE=InnoDB;"
|

使用 eval 工具在表中插入数据
1
2
3
4
| $ sqoop-eval \
--connect jdbc:mysql://192.168.1.1:3305/test \
--username root --password-file file:///tools/.mysql_password.password \
--query "INSERT INTO actor(first_name,last_name) VALUES ('PENELOPE', 'GUINESS'), ('NICK', 'WAHLBERG'), ('ED', 'CHASE')"
|
1
2
3
4
5
6
7
| $ sqoop-eval \
--connect jdbc:mysql://192.168.1.1:3305/test \
--username root --password-file file:///tools/.mysql_password.password \
--query "INSERT INTO actor(first_name,last_name) VALUES ('PENELOPE', 'GUINESS'), ('NICK', 'WAHLBERG'), ('ED', 'CHASE')"
|

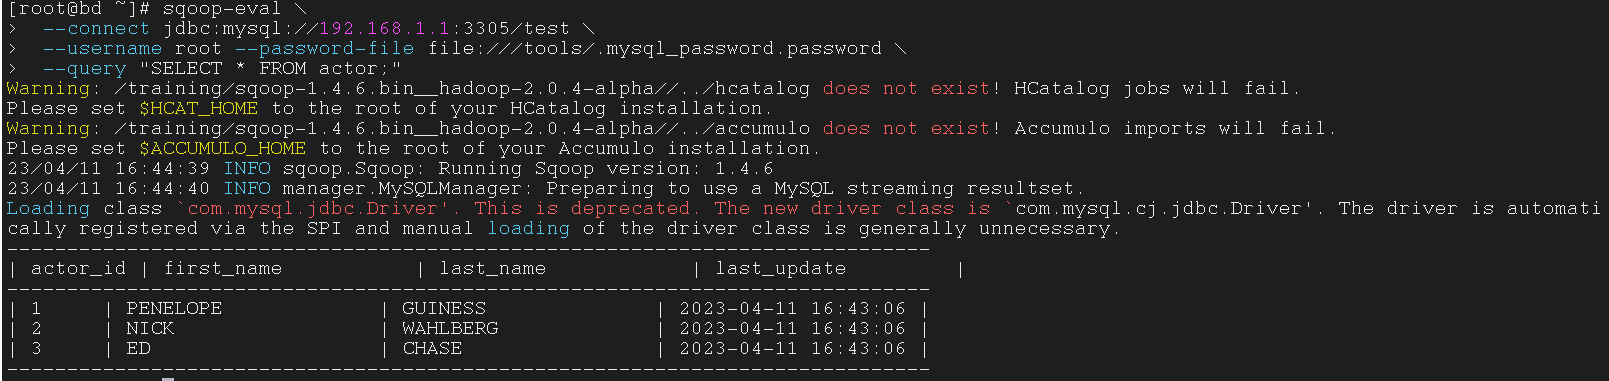
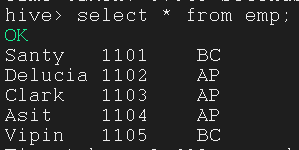
使用 eval 工具展示表中数据
1
2
3
4
| $ sqoop-eval \
--connect jdbc:mysql://192.168.1.1:3305/test \
--username root --password-file file:///tools/.mysql_password.password \
--query "SELECT * FROM actor;"
|
1
2
3
4
5
6
7
| $ sqoop-eval \
--connect jdbc:mysql://192.168.1.1:3305/test \
--username root --password-file file:///tools/.mysql_password.password \
--query "SELECT * FROM actor;"
|

 wechat
 alipay